|
Email me at: kinch@truetex.com Richard J. Kinch Back to Home page |
|
|
Email me at: kinch@truetex.com Richard J. Kinch Back to Home page |
|
Updated July, 2015.
This page is a description of how I replaced torsion springs on a garage door. You may find that my experience either frightens you from trying such a stunt yourself, or encourages you to give it a try. You may curse me for revealing the techniques supposedly known only to the trade, or perhaps thank me for explaining how it's done. All the secrets are revealed below. Even if you hire this work out, just knowing how it is done will help you shop for the best deal and avoid falling prey to overcharging tricks.
Torsion springs are devices that lift most of the weight of a garage door so that the door can be opened manually or by an electric opener. The torsion principle is applied via an efficient and economical apparatus consisting of a torsion shaft under spring torsion, which turns lift drums, which wind cables attached to the door near the bottom. All of this apparatus is mounted over the top of the door. The energy stored is sufficient, in an uncontrolled release, to break things, hurt you, or perhaps even kill you. The same could be said of jacking up your car to change a tire, or mowing your lawn, or raising children, so it is not crazy to want to do this yourself.
This page does not discuss what are called "extension springs", which are involved in a different door lift design that use springs running above the horizontal portion of the door track, perpendicular to the door. Replacement of extension springs is an easier task that is more amenable to do-it-yourself (DIY) effort.
If you've researched this subject at all, you will no doubt have heard that you shouldn't be attempting torsion spring replacement as a do-it-yourselfer. That is generally good advice, so if you have any doubts about your abilities to do risky physical work on your own, hire the job out like everyone else. I found I was capable of doing this work with acceptable risk, because I intelligently understood the techniques, paid careful attention to methods and safety, knew how to use common tools in good condition, properly improvised the special tools I didn't have, and diligently attended to correctly performing a few moments of hazardous manipulation. I learned to do it purely on my own based mostly on bits of advice reluctantly given in Internet forums such as the Usenet newsgroup alt.home.repair. When I first wrote this page in 2002, there was no other do-it-yourself information available on the Web, and it was not until 2005 that reliable information disclosing the techniques started to appear elsewhere (see links below).
I am also an engineer, and have always done a lot of mechanical repairs around the house. I also operate my own laboratory machine shop, and do some mechanical design work there. This background helped me figure things out, but nothing that involved is critical to repairing a standard garage door.
This work is risky, but the risk is comparable to doing your own car repairs, or climbing on the roof of your house to clean your gutters. These are dangerous things that many people can do safely, but that safety depends on intelligent understanding and application of proper techniques. Professional door repair technicians, who are fully knowledgable, skilled, and experienced, report that they nevertheless are injured from time to time, despite their best efforts. Coldly evaluate your abilities and motivations, to judge whether you can manage the risks of this work for the benefit of the money and time you might save.
The right to evaluate risk for oneself is part of what it means to be a functioning human being.
—Mark Steyn
Even if you are intelligent and skilled enough to do this repair, and as much as it may frustrate your instincts for self-sufficiency, you may be prevented from doing this work yourself by a system of commerce that refuses to take your money for the parts.
Manufacturers and distributors of torsion springs believe they are better off not retailing their product directly to the public. They believe they are maintaining higher prices for their product by restricting sales "to the trade." One brochure for parts even flatly stated, "We do not sell to the end user. We protect our dealers," which would seem to be prima facie evidence of an illegal restraint-of-trade scheme. But this is an old story which is true of virtually every product and service, going back to medieval guilds and before.
Repair of garage doors is a licensed trade in many jurisdictions, and manipulation of the market inevitably follows. Look in your phone book yellow-pages under "garage doors" and you'll find a lot of big, costly ads for door service. The profits are quite juicy, I'm sure. The customers need service urgently, and this need will typically arrive suddenly and at a busy time when shopping for prices is not convenient. A few dollars in parts, an hour of labor and travel, and a $150 invoice (assuming the outfit is charging fairly, some are not). Lately (2006) I hear of outfits charging $200 or $300 for this work, and occasionally a story of a $500 or $800 service call. You'll also find the phonebook advertisers waiting eagerly for your call, because artificially high prices inevitably lead to an oversupply of service firms working under capacity.
Those who benefit from this anti-competitive behavior have many excuses for it. They claim that the product is too dangerous and infrequently needed for the public to purchase directly. They say the job is hazardous and requires techniques and tools with which the amateur will rarely practice, which is true. They write me in anger saying I don't understand how expensive it is to put a truck on the road with a technician and parts and salary and benefits and insurance and advertising and every other common business expense. They say it will take the homeowner hours of effort to do this safely and correctly, while they can do it in a fraction of that time and at a price that isn't worth the effort to save. But should they set themselves up as the judge of what you can and cannot do? Of what is an economical use of your time? Imposing minimum order quantities or charging retail prices for small orders is legitimate; inquiring into the purchaser's background is not.
If this manipulative, we-are-your-nanny business approach is truly in our best interests as consumers, then we shouldn't be allowed near ladders, lawn mowers, or power tools. Those products are just as hazardous and prone to misuse as torsion springs, yet no one thinks of them as forbidden. The only genuine difference is that torsion springs are a hazardous thing you need only rarely, while a lawn mower is a hazardous thing you need all the time.
The one excuse that makes the most sense is, "if we sell springs to a do-it-yourselfer, and he gets hurt installing it, we could get sued." I can sympathize with someone who wants to sell only to the trade and not bother with the risk of a spurious product liability lawsuit from an ignorant member of the public. But the lawn-mower dealers have figured out how to manage that kind of exposure, so this is not an absolute barrier to retailing garage door parts to the public. It doesn't explain why torsion springs at retail are virtually non-existent.
These are just my observations as a consumer; I am not on a crusade to change the garage door industry. But I will observe that the Web is the innovation that can finally give intelligent consumers the advantage in these commercial games. Trade restraints work only when all sellers in the market collude in and agree to the scheme. If anyone, anywhere is selling freely, then the Web can help you find them. In the years since I have first published this information, a number of reputable Web-based merchants have appeared to supply the parts you need to repair your garage door as a do-it-yourselfer (and I have linked many of them below).
For the industry point of view, see:
The most common grade of torsion springs have an expected life of about 10,000 cycles. The hardened and tempered steel experiences tremendous forces each time the door opens or closes. Gradually, the steel fatigues with each flexure, and eventually cracks and breaks, usually releasing its stored energy in an instant with a horrific "sproing" noise or bang. If you average about two car trips per day, opening and closing the door a total of 4 times daily when you come and go, then that expected life becomes 2500 days, or only about 7 years. If you have an automatic opener, then if you're like me, you tend to cycle the door even more frequently, and can expect the need for spring replacement even sooner. Moreover, my three-car garage has three doors, so on average I can expect a repair job every few years. Over a lifetime, it is very economical to do these repairs myself.
One of these "sproing" events at our house finally motivated me to research how these repairs are done. This happened in 2002, when my wife parked the chariot and shut the door. After the door closed, there was a horrific noise that she could only astutely describe as, "a big spring snapping and vibrating". Although I have hired professionals several times in the past to install or repair garage doors, the difference this time was the innovation of Google and newsgroups like alt.home.repair. I was determined to learn the process and to search for online parts vendors.
Since the springs are winding "up" when the door is closing and going down, the fully closed position is the most stressful on the steel and thus the most likely position at the moment of failure. This is a good thing, because failure near the top-of-travel means that you suddenly have a large, increasing weight falling. Thus we see the principle that you should never be standing or walking under the door when it is opening or closing, especially if you do so manually instead of with an electric opener. When the springs are working correctly, the door appears nearly weightless, but this is an illusion that turns into a calamity when the springs suddenly fail.
This is your last chance to turn back! I will now describe how I replaced torsion springs. Avert your gaze and read no further, lest you be tempted to do likewise!
|
Here's a view of my door and its broken torsion spring.
This door is 10 feet wide and 7 feet high, constructed of 3/4 thick
hollow wood panels inside with 3/4 inch plywood siding outside to match the house exterior.
This is original to the house which was constructed in 1978, and is much
heavier (238 pounds, as I measured later as described below) than the steel doors most common today in new construction.
The 10-foot width is a little larger than usual for a one-car garage;
such doors are typically only 7 or 9 feet wide.
The ceiling height is 9 feet, providing 18 inches clearance above the torsion shaft.
This is in a 3-car garage with 3 separate extra-wide doors.
Every man's dream! ('cept when the door is broke.)
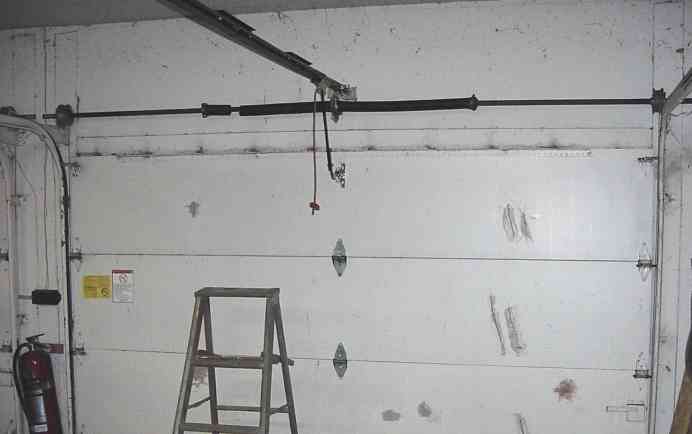
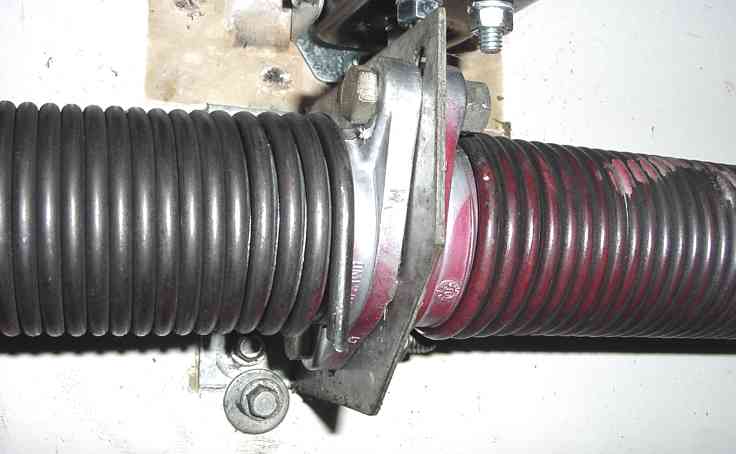
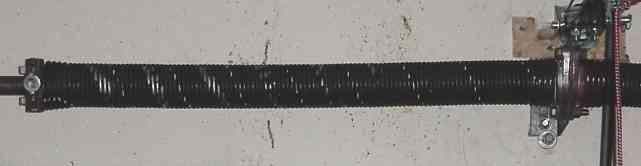
The torsion shaft with lift drums on the ends is above the door. The standard residential door shaft is a 1-inch outside diameter hollow steel tube. The inside diameters of the bearings, drums, and winding cones are sized to loosely fit that 1-inch diameter shaft. At the center is a bearing plate, on either side of which are the torsion springs, or in some cases just one larger spring. The spring pictured on the left in the photo is broken about 1/4 of the way in from its left end. The black shaft with dangling rope and door bracket is the track for the electric opener. In a standard residential door, the axial degree of freedom of the torsion shaft is constrained by the lift drums being set up against the end plates just inside the ends of the shaft. The rotating shaft assembly is thus captured closely between the end plates, but still loose so it is free to turn. The inside of the door panels bear a few dings, since filled with Bondo, from my teenage boys shooting hockey pucks. The streaks on the right that look like dinosaur claw scratches came from operating the door inadvertently when the rear doors of a van were open. The responsibility for these scars is all mine; they have also been Bondo-filled. We tend to use a lot of Bondo around our house. The crud on the walls and ceiling are cobwebs and dust infiltrates. |
|
|
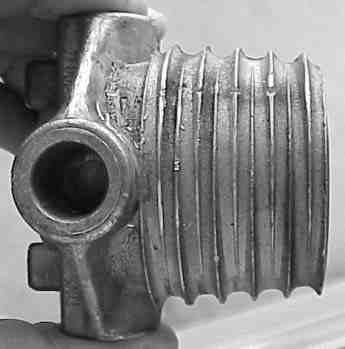
Here's a close-up of that left spring showing how it broke.
The winding cone has 1/2-inch round sockets every 90 degrees for the insertion of
round winding bars. Two 3/8" square-head set-screws fasten the cone to the torsion shaft.
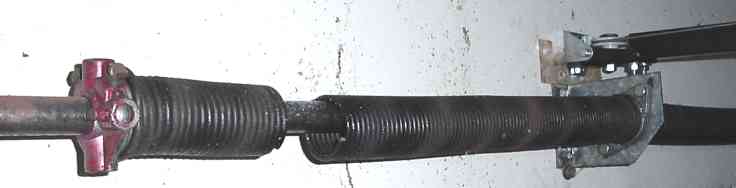
Note the left winding cone with red spray paint. This shpritz of paint is applied to create fear and doubt in the mind of the do-it-yourselfer. Sometimes it is a color code for the wire size (using a DASMA standard, red indicating 0.2253 inch diameter wire). Sometimes it indicates the winding direction: red may indicate right-hand winding, but don't rely on that; do you own independent analysis. Sometimes it is a manufacturer's private code for another dimension than wire size. This color code is for the installer's information when the spring is new; I would not depend on interpreting the color code properly on an old spring, since one can't be certain of a correct interpretation without documentation from the original supplier. The wire size and winding direction are easily discovered and proved, as I will explain below. You absolutely must know and understand the critical measurements of your old springs to order replacements. This assumes that the old springs were the correct to begin with; it is not uncommon to have incorrectly sized springs on a door due to a previous sloppy installation, or a significant change in weight of the door. You must use springs that are matched to the weight of the door. You cannot compensate for the wrong size spring by adjusting the number of winding turns. If you do not know a proper spring size, then you or your spring supplier must calculate a proper size (see below) based on an accurate weight (within 5 pounds) of the door. So you must then in turn have an accurate weight. When ordering springs, be aware that a number of different sizes of springs will make proper replacements, not just the specific size being replaced. The wire size, winding diameter, and length can be traded off to make springs of varied geometry but equivalent torque characteristics. This will also affect the expected lifetime (in cycles) for the spring(s). Since the critical specification for a replacement is the weight it is designed to bear, not the sizes per se, there are likely several stock sizes that replace a given old spring. The spring distributor's inventory may happen to offer only a different size with an equivalent weight-bearing specification. One has to judge whether to trust the advice of the seller in such situations. The seller should have the data to know what substitutions are proper. The right side of the photo shows the center bearing plate where the stationary cones attach with two bolts. Some doors may have only one spring rather than two equal ones as shown here (indeed, old marks on the shaft show that this door originally had one spring about twice as long on one side). Above the center bearing plate is the bracket and track from the electric opener. |
|
|
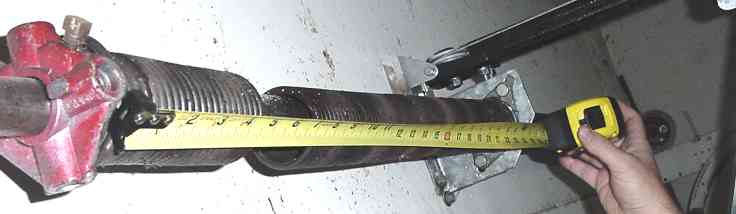
Critical measurements:
Torsion springs come a variety of standardized sizes, so you have to carefully
measure the old springs to know what to order for proper replacements.
Tables of standard sizes and designs are on the Web, such as
here [www.industrialspring.com].
The four critical measurements (all in inches) are: (1) the wire thickness (which I'm measuring here
with a dial caliper; you can also measure the length of a number of closely stacked turns with a ruler
and divide by the number of turns in the stack, measuring 10 turns this way makes the math easy),
(2) the inside diameter (not outside!) of the relaxed (not wound!)
coil, (3) the overall length of the relaxed (not wound!) spring coils, not including
the winding cones, and (4) the right- or
left-hand winding of the spring. One must glibly quote those figures to the spring
supplier, otherwise one's lack of expertise will be obvious, and one will not be worthy
of buying the parts.
Measure springs only when relaxed: Measurements must be taken on a relaxed spring because the winding adds significant overall length while reducing the coiled diameter. If you have a paired design, and one is broken and one is intact, then don't try to measure the length of the intact spring with the door down. A wound spring has 7 or 8 turns adding to the overall length, and will therefore be about 2 inches longer than when relaxed. Measure the lengths of the pieces of the broken spring, which will be unwound, and add them together. As a check, one can measure the length of the intact spring after it is unwound in the procedure to follow below. Be sure also to observe whether the springs are originally of equal sizes, because it is quite possible that they are not. The various increments of standard wire sizes differ by only about 0.010 inch, so calipers or a micrometer would be the tool to use to be certain of the stepped size you have, or else a trustworthy ruler marked in tenths of an inch to use the measure-10-turns-and-divide-by-10 trick. The most common wire sizes in the US are 0.207", 0.218", 0.225", 0.234", 0.243", 0.250", and 0.262". Note that I am measuring a spring that is fully relaxed because it is broken!. The length of the relaxed, unbroken spring is the specification of interest. It is harder to measure unbroken springs on an intact door because the springs should not fully unwind, even at the top-of-travel. If you can't be certain of the spring diameter from indications on the cones, then you have to go through an unwinding procedure to relax them fully for measurement, or perhaps reckon the size from measuring the somewhat smaller diameter at the nearly unwound condition when the door is at its top-of-travel (although one should not attempt to raise a door with a broken spring). Right-hand versus left-hand winding: Springs are chiral, that is, wound or "laid" in either a left- or right-hand orientation. This is a critical property of their design and specification; you cannot substitute a left for a right or vice versa. If you were to grasp the spring in your hand, and if your right hand orients the tips of your fingers like the ends of the coiled wire when your thumb points "out" of the core of the spring, then you have a right-hand spring; likewise left (which end you grasp does not matter). (This also happens to match the "right hand rule" of magnetic polarity, if you happen to be knowledgeable in such esoteric subjects.) Another way to identify the winding is to examine the spring vertically in front of you; if the coils facing you rise going to the right, it is right-hand (thus you can remember, "rise to the right is right-hand"), and likewise left indicates left-hand. Another way is to view the coil axially; a right-hand spring winds in a clockwise direction as it recedes away, and a left-hand spring counter-clockwise. Yet another way, not so easy to remember, is to hold the spring vertically and compare the coil shape to the letter "Z" (indicates right-hand lay) or the letter "S" (indicates left-hand lay). Confused? A last resort is to compare the winding of the spring coils to the threads on an ordinary screw or bolt, which threads lay in a right-handed winding along the axis. An enantiomorphic (mirrored) pair of springs, such as my standard door uses, will consist of one left-hand and one right-hand spring. Note that this "right" and "left" has nothing necessarily to do with whether the spring is mounted on the left or right of the center bearing plate. Indeed, with my standard door, if you stand inside the garage, facing out, then the spring to the left is a right-hand-wound spring, and the spring to the right is a left-hand-wound spring. The photos above and below of the broken spring show that it is a right-hand-wound spring. End treatments: Torsion springs also are made in a variety of end treatments. The "standard torsion end" is most common, as is pictured in my examples, consisting simply of a short, straight length of wire projecting tangentially. Various non-standard end treatments have longer "ears", U-turns, ends bent in toward the center or along the axis, or even loops. Non-standard ends are used in end fasteners peculiar to various manufacturers, which would seem to serve mostly as a guarantee that you buy overpriced replacements from that one source. The replacement springs in my case proved to be 0.2253 wire size, 2.0 inch (inside) diameter, and 24 inches long, in a pair of one left- and one right-hand winding. Actually, the old springs in these pictures were a slightly smaller size, but another similar door on this garage was better balanced by that size. Whoever installed the old springs didn't quite get the weight and size just right; it is not unusual to find a repair service installing a slightly off-balance spring size that happened to already be on the truck during the service call. My electric opener had no trouble handling the small imbalance. But since it is safer to reduce the electric operating force as much as possible through careful balancing, I chose the size that was working better on the other door. The Chamberlain brand electric openers (also sold by Sears) I have incorporate a plastic worm gear that tends to wear out after some years of use, requiring a disassembly and installation of a $20 repair kit; this wear is minimized by a properly balanced door. Correct spring size is determined by factors such as the weight and height of the door. You cannot substitute a different spring and just tighten or loosen the winding to make it balance the load. Why? To maintain cable tension under all operating conditions, the spring must retain about one turn of unspent wind-up at the top-of-travel position, which with the lift drum size and door height predetermines the number of turns of winding at the bottom-of-travel; and furthermore the torsion of the fully-wound spring at the bottom-of-travel must be slightly less than that needed to lift the weight of the door when translated by the lift drums. Although the door weight and drum size determine the maximum torque (termed MIP, maximum inch-pounds) needed from the fully-wound spring(s), the spring selection for a given door can still be varied to adjust the cycling stresses. A heavier wire on a larger diameter or longer length will produce the same torque as a lighter wire on a smaller diameter or shorter length, while undergoing less stress and therefore increasing expected cycle lifetime. The heavier spring will cost more but last longer, so this is another design trade-off. Calculating these spring sizes in the field is done using a book of tables (or the software equivalent) that we cannot provide here, although you will find the formulas to estimate spring properties below. If you can accurately provide the weight of the door, or the size(s) of the old spring(s) (assuming they were well-matched to balance the door), then a spring dealer should be able to tell you which spring sizes will work for you. A spring design manual, also called a rate book, gives tables that relate the torque constant ("rate") and maximum turns for springs of given wire size, diameter, and length. For example, a typical page in a rate book would show a table for a given wire size and inside diameter, the maximum inch-pounds (MIP) of torque available for a standard lifetime of 10,000 cycles in that size, the weight of the spring per linear inch, and the rates of the spring (as IPPT, inch-pounds per turn) for each of various lengths. From these figures one can calculate the lifting capacity, substitutions, conversions, and cycle life upgrades for a door of given weight and drum geometry. The weight-lifting capacity of a given spring is calculated based on its torque constant (IPPT, or inch-pounds per turn), which is the rotational version of the spring constant that characterizes the spring. The IPPT constant is found from tables giving IPPT for given spring dimensions (wire-size/diameter/length). The same tables may indicate the maximum number of turns for various expected lifetimes in cycles. The torque required to balance a given door can be calculated from the weight of the door times the moment arm of the drums (as we do below under "Calculating the Forces We Will Be Handling"). The ultimate torque of the spring in the fully-wound condition is the number of turns (when fully-wound) times the IPPT constant. Choosing a spring to balance the door then simply requires matching the ultimate torque of the spring to the balancing torque. Beware of improprer prior installations: Sometimes the existing door installation is not correct, and the old springs should not be used as a specification for replacements. For example, the old springs might have been replaced with incorrect sizes because the last repairman didn't have the right one on his truck. If your door has never worked quite right, something like this might be the cause. To correct this, you must use the weight of the door to specify the spring, either from a spring rate manual giving spring torque constants, or from the formulas below. Unmatched or mismatched spring pair: You may find that you have a pair of springs that are different sizes. This mismatch may be a normal application, since the total torque on the torsion shaft is simply the sum of the torque contribution of each spring (indeed, very large doors can be lifted with 4 or more springs along the torsion shaft). The sum of the torque rates determine the lift; and dividing the torque among multiple springs does not change this. Some repair shops even apply mismatched pairs deliberately, since a few stock sizes of springs can be combined to fit a wider range of door weights than only matched pairs. For example, a technician may carry springs in increments of 20 lbs of lift, and when using pairs this allows a 20 lb increment in possible choices instead of 40 lb increments. Or, one spring from a pair may have broken and been replaced with a spring of equal torque rate but different size than the original. Having a mismatched pair makes it difficult to specify the correct matched-pair replacements. To obtain replacement springs for a mismatched pair, you can either specify the same odd pair, try to calculate the equivalent matched pair sizes, or (this is the best method:) measure an accurate door weight and calculate the right spring size(s) "from scratch". The spring seller should be able to do the calculations from your accurate measurements of weight, height, and drum size; or you can attempt the calculations yourself using my engineering formulas below. Uncentered center bearing plate: The center bearing plate need not actually be in the center. It doesn't much matter where it is, since the purpose of the bracket is to anchor the spring ends. This anchoring must be secure, since all the torsion is held together at that point. On a stud-framed wall, this bracket may be placed over the stud closest to the center rather than exactly at the center of the door opening. |

|
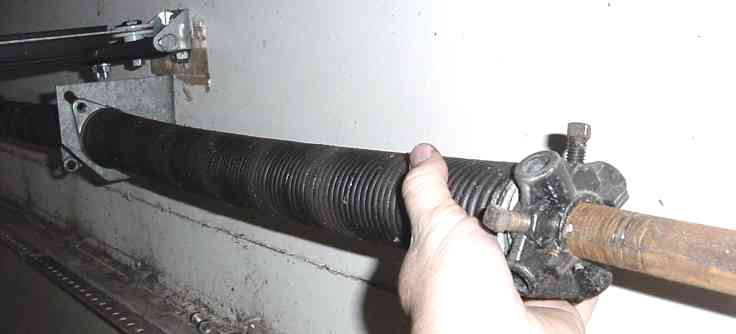
| This is the electric opener which operates this door. I'm picturing it here because you pull the rope to disconnect the trolley, run the trolley under power to the fully-open position, and then disconnect power before working on the door. Then you should lock the door down with either the security lock or with Vise-Grips or C-clamps. This avoids the door lifting when you don't expect it as you are applying spring adjustments. It you were to foolishly overwind the spring without the door locked down, you could possibly find the door trying to leap up to the raised position when you aren't prepared. That would likely knock your grip off the winding rods, with potentially disastrous results. I like to work under the safety principle that serious accidents should be physically possible only when you make two or more stupid mistakes at the same time. |

|
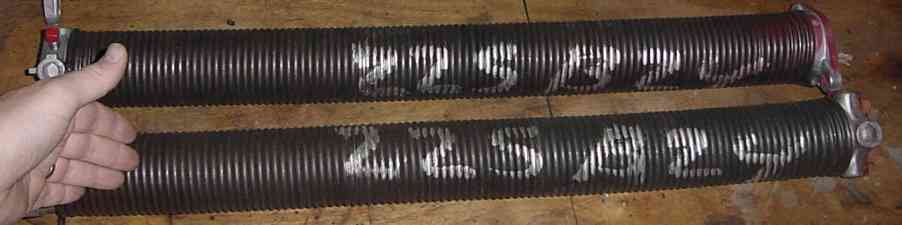
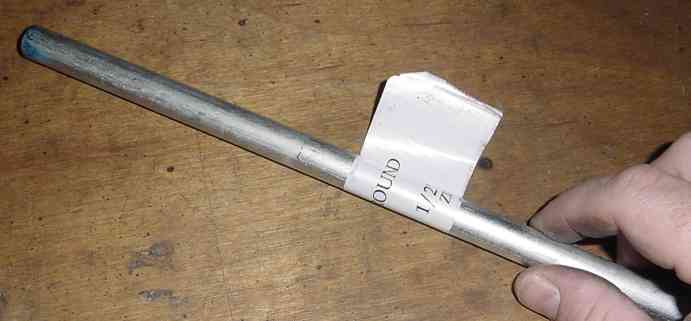
| A tape measure is fine for learning the overall length of the relaxed spring. The gap where it is broken shouldn't be counted in the length, nor should the winding cones, just the wire part as if it were relaxed and unbroken. This length for standard springs is commonly an even number of inches. |
|
|
Here are the new replacement springs I ordered from a distributor, which I found
using a Google search for "garage door supply"
(search that phrase now).
You certainly won't find these at Home Depot or Lowe's (although last I checked Lowe's does
carry the less daunting extension spring replacements).
I also have a list of some suppliers at the end of this page.
Cost was $88 for 2 pairs of springs, plus $21 shipping. (I had to order 2 pairs to meet the $50 minimum order.) They came with new cones inserted as shown at that price, so I didn't bother trying to remove and reuse the old cones to save a few dollars. The cones are quite difficult to remove from old springs and to insert in new ones, and the spring supplier will have the right tooling to do that easily. That was the best price I could find on the Web at the time, and didn't seem out of line with what parts like this might cost at at the building supply (if they only sold them). Contractors buy these much cheaper in quantities; they're just an ordinary high-carbon steel wire turned on a winding machine. I also found Web sites asking a lot more money, obviously trying to cash in on search-engine traffic from do-it-yourselfers. Others report that some local dealers sell springs at retail, but at a high price that eliminates any economy versus having them installed. Spring pairs should be replaced together, since the mate is likely to fail soon after the first, and any possible savings in parts isn't worth the extra effort to repeat the work later. These springs weighed in at just over 9 pounds each, including the winding cones. They are covered with a light film of oil, and at this point the job starts to get messy. The manufacturer has painted them with a "225B24" part number, which no doubt indicates the 0.2253 inch wire size, 24 inches long. Perhaps the "B" indicates the 2-inch inside diameter. Both the left- and right-hand springs have this same number on them. I repeat my caution about the uncertainty of interpreting color codes. A professional installer reading this page emailed me to say that the red color indicates the springs are right-hand windings, not the DASMA color code for the wire size. But this photo shows both a right- and a left-hand spring, and both have the red paint on the cones and set-screws. I conclude it is prudent to make your own measurements and analysis. Do not rely on the colors on old installations. The only time I would respect them would be on new parts that carried documentation giving the code. Yet another professional wrote me to say that the red paint on certain components of these assemblies is an "industry standard" that signals, "Danger! Part under hazardous tension." Other items under tension like the bolts on the cable attachment plate on the door should therefore also be painted red. If so, then this is a new, ambiguous, unreliable, and little-publicized standard, because none of my old hardware shows it, red paint also means other things, and searching the Web does not readily turn up references to this practice. Springs should be handled with some care so as not to nick or abrade the wire. Such flaws can weaken or stress the wire, leading to premature failure. This caution applies to every step in the process of shipping, storage, installation, and usage. Removing winding cones from an old broken spring for reuse in a new spring: Springs without the winding cones installed are a little cheaper than with the cones. Twisting the old cones into a new spring is easy with a vise and pipe wrench, but it can be tricky removing old cones from a broken spring for reuse. To remove old cones, mount the cone in a vise such that the spring portion is free. Grab the last few turns of the spring in a pipe wrench, engaging the teeth of the wrench into the end of the spring wire. Turn the wrench against the end of the spring wire, releasing the end of the spring from its clamping onto the cone, as you twist the loosened spring off the cone. Another more certain if not brutal method is to use an angle grinder with a thin metal-cutting disk to cut through the loops of spring wire where the loops wrap around the cones, being careful not to nick the cone itself too much. You could also cut into the old spring loops with a just hacksaw and break off the loops with hand tools, but this will require a lot of effort. |
|
 Here is what a winding cone looks like without the spring.
The threads that grip the inside of the spring coils are ambidextrous, so you can use the same part
on either right- or left-hand-wound springs.
The cone size is specific for a certain inner diameter of springs, so if you have the wrong size,
the cone will slip inside the spring (cone too small), or not fit (cone too big).
Here is what a winding cone looks like without the spring.
The threads that grip the inside of the spring coils are ambidextrous, so you can use the same part
on either right- or left-hand-wound springs.
The cone size is specific for a certain inner diameter of springs, so if you have the wrong size,
the cone will slip inside the spring (cone too small), or not fit (cone too big).
|
|
The two set-screws in the winding cones have a 3/8-inch square head, which fits a
3/8-inch open-end wrench or 8-point socket, or a 7/16-inch 12-point socket or 12-point closed-end wrench.
I carried an extra wrench in my pocket while winding, since I didn't want to
be holding a wound spring that I couldn't set because I had dropped the wrench (although
one could rest the winding rod against the door in this case while picking up a dropped
tool).
I decided later to use an ordinary open-end wrench rather than this socket or a box-end wrench to turn this fastener. The extra play fits the crude square heads better, and if the cone were to accidentally let loose, an open-end wrench would be the least likely tool to stay on the head and turn into a flying hazard. |

|
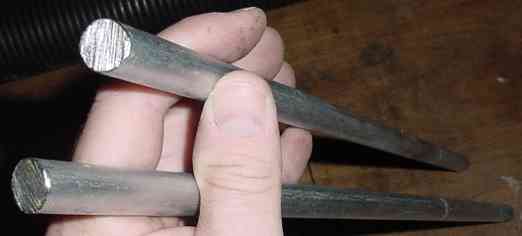
| The standard winding tools are simply a pair of 18-inch lengths of mild steel rod, 1/2-inch diameter. Winding cones can have different socket sizes (such as 5/8 inch instead of 1/2 inch), so it is important to measure the socket and select a matching rod diameter. Also beware that poor-quality cones may have a sloppy fit to the winding bars, and a loose fit presents a severe hazard of slipping at the worst moment; anything more than about an inch or two of play at the handle end is too loose for safety. I bought a 3-foot length of zinc-plated 1/2-inch diameter steel rod from Home Depot for about $3, which conveniently cuts into two halves of just the right length (the store might even cut it for you if you ask). A steel supplier selling at commodity prices might charge about 50 cents or so for such a piece that weighs about 2 lbs. Drill rod would work if used in the annealed condition in which it is originally sold, but the added expense provides no benefit and the brittleness (if it had been hardened and not annealed) would worry me a bit. Rebar, threaded rod, screwdrivers, etc., are absolutely foolish as they will not fit the socket snugly. Aluminum rod is definitely too weak, and will bend under the torque that must be applied. Longer rods would make for more leverage but unwieldly swing; shorter rods make for uncontrollable swing. As we'll calculate below, the 18-inch standard tool length is an appropriate compromise. Note that you do not need 18 inches of ceiling clearance above the torsion shaft to use an 18-inch rod, since you need not swing the rods above horizontal when winding. |
|
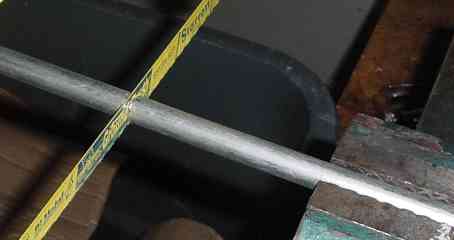
| Clamping the rod stock in the vise and cutting it into two 18-inch winding tools is a quick job with a sharp hacksaw blade. |
|
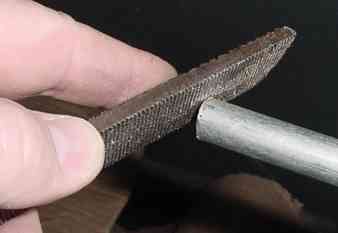
| I filed the ends of the rod to remove burrs and square the tip. You don't want a sharp edge cutting your hand at a critical moment. |
|
| The finished tools each have one end shear-cut from the factory, and one end that I saw-cut and filed. These are the two saw-cut ends. |
|
|
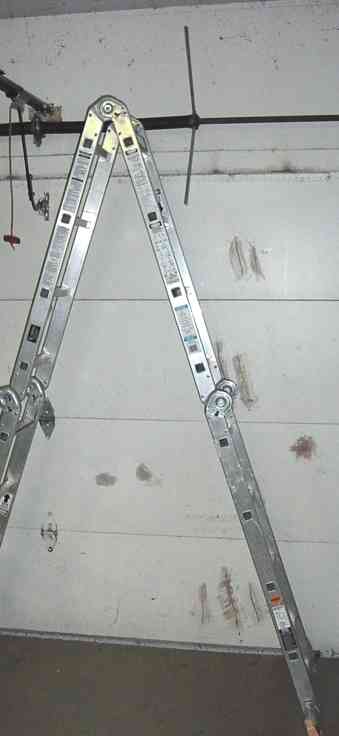
Here are the winding rods inserted in the winding cone of the unbroken old
spring, posed just for a picture.
Note that I have carefully placed a sturdy, steady ladder just clear
of the swing of the rods, such that when I am standing on the lower
rungs to reach the rods, that my head and body are clear of the
"kill zone" around the spring and cone.
You must have a trustworthy platform to stand on, because a slip or
shake of the ladder while you are winding can cause you to lose your
socketed attachment to the cone, letting loose the spring.
I would not trust an ordinary household step ladder for this purpose.
One might stack lumber or arrange some other low platform for a steady footing, instead of the ladder. The aluminum ladder shown here is the splendid 16-foot Krause Multimatic, which carries a Type 1A Industrial rating (300 pound working load); I highly recommend it. However, product liability apparently forced this company into bankruptcy in September 2000 and the company ceased operations in June 2001; see http://www.krauseladders.com (this Web site went dead sometime in mid-2002). The world is a dangerous place. This picture shows the upper rod pointing at an upward angle, even though you don't need to wind it that high. Winding is accomplished by swinging the rod from pointing down to pointing horizontal. This pose was just to allow me to take a photo with the rods in the cones. Glass windows are another hazard with doors so equipped. The glass can be broken by a slip of your tool, a spring breaking during winding, or other mishap. So one should take extra care when working near glass. |
|
Does winding these springs require an herculean effort from a muscular pair of arms? Does it start out easy, but in the end exhaust and trap you where you have no strength to either finish or back off? Let us apply a little engineering discipline to such questions.
"Felix qui potuit rerum cognoscere causus."
—Virgil, Georgics
Translation: Happy is he who knows the cause of things.
"Superbus est, qui loquitur in prouerbiis Latinis."
—Kinch, Metallum Flexu pro Ostium Currum
Translation: Snobby is he who quotes Latin proverbs.
To estimate the maximum physical force required to wind these springs, consider that they are balancing the weight of the door with a torque applied to a lift drum on each end of the torsion shaft. The lift drums have a 2-inch radius, which is the standard residential size, and corresponds conveniently to about a 1-foot circumference. If we pessimistically assume the 10-by-7-foot door has a weight of 350 pounds, this implies a torque of 350 pounds on a 2-inch radius, that is, 700 inch-pounds, or 58 foot-pounds. Each of the two springs should be exerting slightly less than half of the balancing torque, or 29 foot-pounds. Compare this to, say, the bolts in an automobile, which are typically torqued to values of about 50 foot-pounds, or tire lug nuts, which may be torqued to well over 100 foot-pounds.
Since we're using an 18-inch (1.5 feet) winding lever to wind each spring up to 29 foot-pounds, we must apply a maximum tangential force to the end of the winding lever of about 20 pounds. Later we'll see that the actual weight of this rather dense door is 238 pounds, implying a maximum tangential force on the winding levers of only about 13 pounds!
Now 13 pounds of force must be respected when backed by many hundreds of foot-pounds of stored energy, waiting to be released. Holding this torque is equivalent to stalling a 3 horsepower DC motor. But holding and turning these handles does not require extraordinary human strength. Note that this maximum tangential force depends only on the weight of the door, and the radius of the drums, and is divided by the number of springs (some designs have only one longer spring, as mine did originally, instead of two shorter ones). Higher or lower lift distances imply more or less turns to wind the spring (and thus a different spring geometry), but not more force on each turn.
Considering energy instead of force: Work or energy can be measured as foot-pounds, which is to say, the product of the weight lifted times the distance lifted. The energy stored in the spring is equivalent to the weight of the door times the distance it lifts, since these two are approximately in balance.
A standard residential door raises 7.5 feet, but since the door goes horizontal this is equivalent to raising the whole door for half that distance, or about 3.75 feet. So if the door weighs, say, 150 lbs, then the energy supplied by the springs is 3.75 * 150, or about 563 foot-pounds. This is like throwing a 50-lb sack of cement up a 11-foot flight of stairs. Or catching a 50-lb sack of cement dropped from 11 feet up.
Not something you want to be catching.
Interestingly, this 563 ft-lbs is about equal to the muzzle energy of a .45 pistol bullet at point-blank range.
Speed of a falling door:: Physics tells us that the transit time of a free-falling body is sqrt(2x/g), where x is the length of the fall and g is the acceleration due to gravity (32.2 ft/sec^2). If this typical 150 lb door were to fall an equivalent of 3.75 feet, this falling time would be sqrt(2*3.75/32.2) = 0.48 seconds (480 milliseconds). The terminal velocity is gt, or 0.48 seconds * 32.2 ft/sec^2 = 15.5 ft/sec = 10.6 mph.
Dodging a falling door:: Reversing this equation gives us x=gt^2/2 as the fallen distance x for a given time t. How much time would you have to dodge a falling door if the spring were to suddenly break at the top of travel? Let us assume you are 5.5 feet tall, so the door will hit your head after falling 2 feet from its 7.5 foot fully-raised height. This 2-foot fall takes sqrt(2*2/32.2) = 0.35 seconds (350 milliseconds). The quickest human response time is about 200 milliseconds, so even if you are alert to the hazard, this leaves you only about 150 milliseconds to accelerate and move your noggin out of the way. If you are an Olympic gold medalist in the 100 meter dash, you can accelerate (horizontally) about 10 feet/second^2, and your 150 milliseconds of wide-eyed panic will move you all of 10*0.15^2/2 = 0.11 foot = 1.35 inch.
Thus it is humanly impossible to dodge a falling door. If the spring happens to break when the door is moving up or down somewhere in the middle of travel, as is more likely, then you'll have even less time. Hence it is not prudent to stand or walk beneath a moving garage door. Of course people often do, and the only reason this does not frequently kill people is that springs typically break at the bottom of travel, where they are stressed the most.
Speed of a thrown winding bar:: The springs, being in balance with the door, effectively are able to launch a typical 150 lb door at 10.6 mph speed. An 18-inch long by 1/2-inch diameter steel winding bar happens to weigh about 1 pound. Since momentum is conserved, this 150:1 ratio in weight of the door to the winding bar means the fully-wound springs could potentially throw a winding bar at 10.6 mph * 150 = 1590 mph = 2332 ft/sec, assuming the energy were perfectly coupled and transferred. If the energy transfer were only 1/3 efficient, this would still be the 800 ft/sec speed of a typical pistol bullet. Except it is a foot-and-a-half metal spear, not a bullet.
Again, not something you want to be catching.
|
With the rods and other tools at hand, I am ready to begin.
The first task is to remove the broken spring and its unbroken mate
from the torsion shaft.
To remove and disassemble the shaft and lift drums, the torsion on the
unbroken spring must first be released. I used a ratcheting box-end wrench
to loosen the set-screws while pushing the rod against the force
I knew would be released when the screws let go.
Later I switched to an open-end wrench for the set-screws, since some of the
square screw heads were too rough to fit in the box-end wrench.
It is prudent to be prepared for torque from either orientation when loosening the set-screws. This protects you from a miscalculation of the force orientation or from an attention lapse. If it isn't marked already, you should run a chalk line (as described below for the new springs) down the length of the old spring before unwinding, so you know how many turns it took to unwind. This will give you a starting value for the number of turns in the new springs. By each "turn" is meant a full revolution of the winding cone. Each full turn requires four quarter-turn manipulations of inserting and switching the winding rods. My door is a very common height of 7 feet, which with the 4-inch drums requires about 7-1/4 or 7-1/2 full turns on the springs. This is the moment of truth for the beginner, as you will be holding the full force of a fully-wound torsion spring for the first time. It is time to adopt a calm, quiet, deliberate, careful attitude of concentration. Make sure that the telephone, a bystander, or other distraction is not going to startle you or make you lose your concentration. Loosening or tightening the set-screws is the moment of most risk, since the end-wrench is a potential missile if you slip, and your hand is close to the cone. When the wrench is removed and only the rods are in place, it would seem that the worst that could happen is that the rod is flung out and the captive spring and cone rattle around, assuming you are keeping yourself clear of the rod's radial disk of rotation, and not leaning on the rod such as to fall into the apparatus were the rod to slip out of your grasp. The torsion shaft design has the virtue of capturing the mass of the spring and cones reliably on the shaft, preventing these parts from launching themselves as projectiles, even in an accident. The prior clamping of the set-screws tends to have pressed a dimple into the hollow shaft and to have distorted the shaft's roundness into an eccentric shape. While releasing the set-screws, I was careful to loosen them enough to let the cone swing around any such distortions. I was also careful to observe any binding of the old cones on the eccentricity or burring on the shaft. The fit of the cone on the shaft is supposed to be loose enough to avoid binding, but if it were to occur one would have to be careful not to assume the spring was unwound when in fact the cone was just stuck on the shaft. If I had a stuck cone that I could not unwind with a little extra force, then I would have called in a technician to deal with it. In the worst case, I suppose the spring must be deliberately broken with some hazard, thus releasing it for a forceful disassembly, and the shaft and some other parts replaced. But this is an unlikely situation and in this case was not necessary. The winding technique is simply to (un)wind as far as one rod will go, where it is pressed against the top of the door, or nearly so, by the unwinding torsion. You insert the other rod in the next socket, remove the first rod, and continue. At any point you can stop and rest by leaving the active rod pressed against the door, where it will be held by the unwinding force. I would make a quarter-turn increment that way, and let go for a moment to collect my attention for the next increment, almost in a quiet, meditative alertness. While you can go from one quarter-turn and rod-swap to the next continually without letting go, working fast against the steady tension seemed to invite a kind of shakiness in my arms that was a bit unsettling. It isn't that there is much physical exertion, it is more that the tension is unrelenting, like peering over a precipice. While winding or unwinding, one must be mindful of the possibility that the spring could break during winding process itself. If that should happen while the spring is significantly torqued, hazardous forces on the winding bar will suddenly become unbalanced, and the bar will take an unexpected jump, possibly injuring your hand or anything else in its path. At the same time, the spring remnants, although captured on the torsion bar, will create a frightening racket that would give the bravest soul a start. So your winding technique should be firmly in control of the rods, and you should not be so delicately perched on a ladder such that a startle will result in a fall. Depending on the design, you can know in advance how many turns are going to have to be unwound. Lifting a 7-foot door by winding a cable on a 4-inch diameter (about 1 foot circumference) drum requires about 7 turns, plus one extra turn to maintain cable tension at the top-of-travel. Maintaining tension at the top-of-travel is critical; without it the cable will jump off the drum, requiring a serious repair. |

|
You might be thinking: Aha! Why don't we lift the door, clamp it in place, and install the springs while they are thus safely unwound, rather than deal with all that accumulation of hazardous torque? The answer: At the top-of-travel, the unwound springs are not fully relaxed; they are still clamped to the torsion shaft with a significant stretch along the shaft axis, plus about a half-turn to keep the door snug at the top. This extra length amounts to the stacking of extra turns that accumulate from winding, also termed "spring growth" in the business. In my case this is about 7 turns of 0.2253 wire, or about 2 inches. Stretching the spring that much and clamping it with a half-turn or so of twist is not feasible.
Even if one could somehow stretch and clamp the springs to the proper extra length, the process would still be more trouble, and there would be little or no reduction of risk. Lifting the full weight of the unsprung door by hand and clamping it in the raised position is dangerous in itself, and creates the same amount of stored energy as winding the springs, ready to slip out of your hands. Many doors won't travel far enough up the track to provide clearance to access the springs. You're also going to have to deal with winding stiff steel cables onto both lift drums at once without any resistance to maintain tension. Finally, even if you managed to complete the installation with the door raised, you then have to lower the massive door against an untested balancing torque. If you've made a mistake, then that massive door has nothing but your skeletal force applied through your meat clamps (hands) to prevent it from falling down and crushing whatever is in the way (perhaps your feet?).
If you're clever and equipped with a welder, you might think you could get away by welding a broken spring back together. At least two factors make this extremely risky. First, the weld itself may fail, either due to insufficient basic strength, or weakening of the nearby parts of the spring. Second, the fact that the spring was old and fatigued enough to break once, means that it is likely to break again soon at other location(s).
If the spring is broken near a winding cone, you might think you can remove and discard the short broken piece of spring from the cone, clean up the end of the long remaining spring, and insert that end into the cone. This is another extrememly risky improvisation. The shortened spring is not going to have the correct weight-bearing characteristics for the door, so you will not be able to balance the door properly. The shortened spring will be proportionately overwound, resulting in extra stress that will increase the expectation of another fracture. And the aging and history of the original spring being broken greatly increases the likelihood of another fracture at other locations.
So discard your old springs and replace them with new. Don't try to repair or reuse them when they're broken.
|
Phew! The hazardous torsion is all removed from the old spring. Now the disassembly can begin,
with our old friend gravity as the only acceleration threatening personal safety.
Most situations allow you to replace spring(s) without removing the assembly from the wall, if there is enough clearance in the surrounding garage structure at the ends of shafts. By unbolting the end bearing plates and removing the drums, you can run the springs down to the ends of the shaft to remove and replace the springs. This avoids the balancing act of holding a long, wobbly, heavy shaft while climbing up and down a ladder. This is how the professionals get the job done in a few minutes. In my case, removing and replacing the relaxed springs required that I take down the assembly: torsion shaft, lift drums, and bearings. Doing that requires unbolting the center bearing plate from the wall, removing the drums from the shaft, and finally sliding the shaft back and forth out of the end bearings to remove the whole assembly off the wall. I am fortunate to have a lot of clearance in this garage to make the disassembly simpler. Tighter clearance to walls or ceiling would make disassembly a more difficult manipulation. |
|
|
Once the springs are relaxed and loose on the torsion shaft, the lift drums
lose their tension on the lift cable, and the cable comes loose. The end of
the cable is terminated by a press sleeve, which locks into a ramp on the
drum. Different drum styles have a bolt or other method to fix the cable
end to the drum. These steel cables are springy and won't stay in place
without tension. If my pre-inspection had showed that these cables were
worn or frayed, then I would have ordered proper replacements ahead of time
from the spring distributor, since this is the opportunity to replace them.
Standard hardware-store cable and fittings are not appropriate.
Once the shaft, springs, and center bearing plate come down and lay on the floor, the old springs should be easy to get off and new ones slid on and assembled. Two bolts hold the center cones to the center bearing plate. The bearing on the center plate can be oiled while it is exposed from having the springs off. At this point it is a relief to be working with inert parts while standing on the floor rather than energized parts while up on the ladder. You might think it would save a little time to replace the spring with the shaft left up on the wall, but I found it was easier and safer to lower the works down to the garage floor first. As noted above, set-screw clamping may have distorted the cross-section of the shaft and made it difficult to slide off all the hardware. With the shaft on the floor, it may be possible to restore enough roundness to proceed, using compensating clamping force to the distorted area via a machinist's vise, an arbor press, a hydraulic shop press, etc., on the shaft body. Burrs and other slight distortions on the shaft can be filed off with a hand file or touched with an abrasive wheel on an angle grinder. At some point, the condition of the shaft may just be degraded enough that it ought to be replaced. I mentioned earlier that this apparatus had at least one prior spring replacement, with a single longer spring having been replaced by two shorter springs. The clamping of the original spring had pressed dimples and an eccentric distortion into the hollow shaft. While this distortion was large enough to block the old cones from sliding across, I was able to remove the old hardware by just sliding them in the other direction. I did not have to bother trying to press out this distortion, since I could just work around it. I was careful not to assume that the previous installation correctly oriented the right- and left-hand springs on the correct sides of the center bearing plate. They could have been installed backwards by an incompetent installer, resulting in them having been wound looser (larger diameter coil) instead of tighter (smaller diameter coil) than when in their relaxed state, and if so I would have corrected them on the new installation. The proper orientation of the springs applies their reaction torque from tighter winding such that it turns the drums to lift the door. Verifying this is a rather simple exercise in mechanical visualization, but does require some care to be certain of correctness. If you were to install the springs backwards, and then start to wind them in the wrong direction, then the torsion bar will start winding the drums backwards, and not holding against the vise pliers, which should be obvious to inspection. Winding a spring backwards also tends to screw the spring off the cones; this error cannot proceed too far before the spring slips off the cones. At this point I weighed the unlifted door to confirm and fine-tune my calculations. This is not strictly necessary, but it makes the adjustments easier to perform, if you happen to have a scale with the requisite capacity. With some helpers, we first lifted the door a few inches and rested it on blocks of wood to provide clearance underneath. Then I slid a 400-pound-capacity freight scale under the center of the door, we lifted again to remove the blocks, and lowered the door gently onto the scale. This door weighed in at 238 pounds, which is very heavy for a single-car door. Since the outside of the door carries the 3/4-inch plywood paneling to match the house, and that plywood weighs about 2 lbs/sq-ft, I estimate the door weight to be about 7 x 10 x 2 = 140 lbs of paneling with the rest 238 - 140 = 98 lbs the interior panels, hardware, and cobwebs. Knowing this total weight will help later in adjusting the torsion on the springs. After weighing, we removed the scale and blocks, leaving the door fully lowered again. Had I not had a high-capacity freight scale, I might have improvised a crude weighing device from levers and smaller weights of known mass, or a lever arm pressing a reduced proportion of the full weight onto a lower-capacity scale. Another factor to remember is that The weight of a wood door can vary with humidity. The door and tracks at this stage of the repair are in a minimum-energy condition. This is a good opportunity to work on any hinges, bearings, rollers, cables, or tracks that need tightening, repair, lubrication, or replacement. Again, these parts should be available from the spring source, and should be ordered based on a pre-inspection. Home-improvement stores carry some of these parts, but the type and quality may not be the best. |

|
|
Next, the torsion shaft is reassembled with the new springs, the drums repositioned loosely on the shaft,
this whole assembly slid
back into the end bearings, and the drum set-screws tightened down.
I tightened the set-screws about 1/2 or 3/4 of a turn after contact with the shaft, which
provides a good grip, but does not distort the shaft.
The drums can be set on their old positions, if they were correctly installed, which is snug
up against the end bearings to remove any longitudinal play in the torsion shaft.
Now the lift cable can be reattached to the drums, and a slight temporary torque
applied to the shaft to keep the cable taut while the first spring is wound.
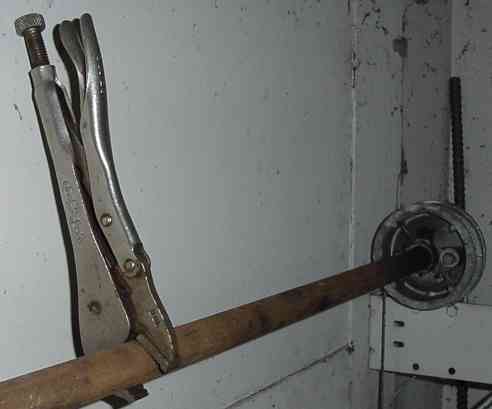
This temporary torque is conveniently applied with a pair of locking pliers clamped on the shaft,
positioned such that they hold the torque by pressing lightly against the wall above the door,
before you start the spring winding,
The locking pliers stay on the torsion shaft until you have finished the spring winding
locked down the spring cone(s) with the setscrew(s), and removed the winding bars.
Then you simply remove them with the release on the wrench handle.
I feel that any job that doesn't require a trick manipulation with either locking pliers
or duct tape (or in the ultimate case, both!) is just too boring. My trusty pliers look a trifle
rusty ever since I used them to clamp something on my outdoor TV antenna "temporarily" and left them out in
the weather for, oh, several years. The white stuff on the drum is paint overspray from the
original painting of the garage interior.
If you have paired springs, you can take a shortcut here instead of using locking pliers. Simply apply a slight torsion to the bar by clamping one of the springs with an easy half-turn or so applied. This will hold the lift cables in slight tension while you wind the other spring. If you have a single spring design, you can't use this trick, and have to use the locking pliers. Checking if the lift drums need resetting: The old position of the lift drums on the shaft may have slipped or otherwise lost the the proper position, requiring a reset of the drum position on the torsion shaft. You will also reset the drums if you are replacing the lift cables, since the new cables will not exactly match the length of the old ones. Problems like uneven tension on the cables, or a tilted door, or a door that doesn't easily stay aligned with the tracks, can be due to an improper "set" of the drums on the shaft. So one shouldn't assume the old positions are correct. Setting the drums on a "fresh" part of the shaft will avoid the possibility of damaging the shaft from retightening in the same dimples. Resetting the drums, if needed: If the drums were incorrectly set in their old positions, one must reset both drums in new positions on the shaft. This is complicated by the presence of old dimples in the torsion shaft from previous setting(s), which must be avoided lest they improperly influence the new setting of the drums. To begin this process of resetting the drums, the door must first be lowered and resting level on the floor, the spring(s) must be in the unwound condition with their set-screws loosened, and the lift cables wrapped around the drums. If for some reason the door does not rest level on the floor, such as the floor being uneven, then insert temporary shims between the door bottom and the floor to bring the door up to level. Loosen the set-screws on the drums, and turn the torsion shaft to avoid the old dimples from the set-screws in the old drum position. Tighten the set-screw on the left drum (that is, on your left as you face the door from in the garage), creating a new dimple, and apply tension to its cable with the locking-pliers technique, enough tension to keep the cable taut but not enough to start to move the door up. Attach and wind the cable on the opposite (right) drum by hand until the cable is similarly taut, and set the screw, remembering that tightening the screw will tend to add a bit of extra tension to the cable. Both drums should now be fixed on the torsion shaft, with the cables about equally taut (listen to the sound when you pluck them like a guitar string) and the door still level on the ground. Setting the left drum first, and the right drum second, will allow you to take up any slack in the cable introduced by the left drum rotating slightly with respect to the torsion shaft as you tighten the set screws. This alignment and balance of the cables, drums, and door is critical to smooth operation and proper closing. If you have a single-spring assembly, the distance along the torsion tube from the spring cone to one drum is longer than to the other drum, which allows a bit more twist to one side than the other, and you may have to compensate with the setting of the drums. Lift cable placement: On the standard residential door mechanism, the loops at the lower ends of the two lift cables loop over the two bottom roller shafts which project from the bottom bracket on the door. The upper cable ends fasten to the drums using one of the methods described above. The drums are positioned along the torsion shaft such that the inner edge of each drum is approximately over the edge of the door. The cable winds onto the drum from outside in, so at the top of travel the cable is winding onto the inner edge of the drum, vertical from the edge of the door where it is looped over the roller shaft. As the door is lowered, the cable winds out to the outer edge of the drum, and thus is a bit out from the vertical, but the cable still falls in the gap between the guide rails and door edge. My cables rub and slap on the rails a bit, but after 30 years and many 10,000s of cycles, they don't seem to have worn at all. Cable fail-safe redundancy: Based on the proper setting of the drums on the torsion shaft, the two lift cables divide the lifting force equally to keep the door level as it rises. This not only levels the door, but also provides a fail-safe mechanism. If one of the cables should fail, such as from breaking or losing its end attachment, the other cable will then carry the full weight of the door. This will pull the door up on one side with twice the normal force, while the other side falls from its now unsupported weight, tending to make the door bind in its tracks and jam. Although not foolproof, this is a safety feature of the design which keeps the door from falling catastrophically if a cable were to fail while the door was traveling. The jammed condition also prevents a lowered door from opening with the hazard of a single broken cable, further minimizing the chances of both cables failing. Since if one cable fails the other must sustain the full weight of the door, the cables and attachments are rated many times the normal working load of half the door weight. A proper safety inspection of the door should include a critical look at the cables and their attachments. Leveling the door: Before commencing the spring winding, to check that you have the door properly leveled on the cables, considering all the factors above that make this a tricky adjustment, apply the winding cone setscrew lightly to lock the (unwound) spring cone temporarily on the torsion shaft, and momentarily lift the door slightly off the floor. Adjust the drum set as needed to level the door, repeating this slight lift test. Loosen the cone setscrew before winding the spring(s). |
|
|
Here is the center bearing plate with the new springs in place.
While everything is loose, it is time to check the soundness of the mountings to the building frame
and repair anything that was incorrectly installed or has deteriorated.
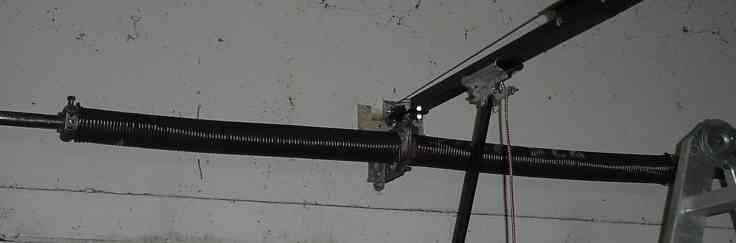
In the photo, you can see an extra lag screw on the bottom of the plate, reinforcing weak anchoring from the original two screws (hidden behind the springs). This extra screw was applied by a professional garage door technician on a previous repair visit. I have since replaced the backing with a sound plywood panel anchored into the concrete door header. Since these bolts clamp all the opposing torsion to the wall, the attachment must be sturdy. The end bearings near the drums also get a few drops of oil. |
|
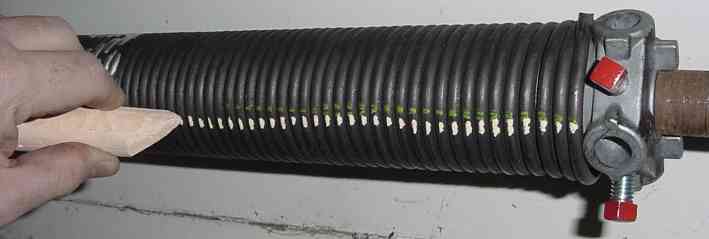
| The last step before winding is to run a piece of chalk down the length of both relaxed springs. This lets you observe the number of turns as you wind. You don't want to be busy counting turns when you should be paying attention to the winding rods. |
|
| The new springs are chalked and ready to wind. Time for one last check of fasteners and cables before applying torque. |
|
|
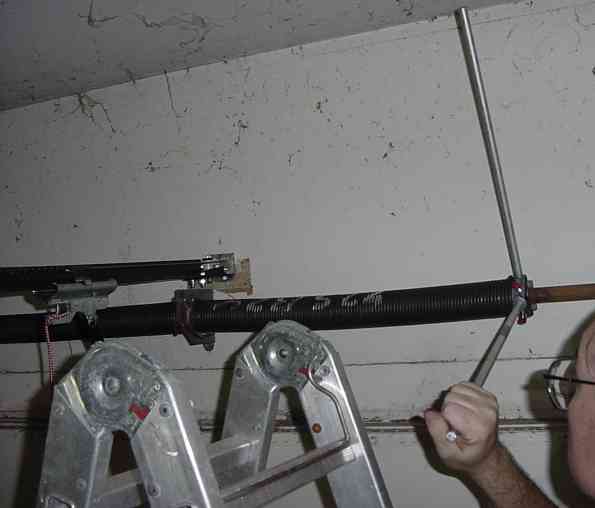
Another moment of truth arrives as the winding-up of the springs begins. (I
am just posing here with the camera held out in my left hand. Except for
lifting the door onto the scale, this was a one-man job, including the
photography.)
The position of the bars in this photo was necessary to take the photo,
and does not show a correct winding technique,
You should not have to swing the bar up as high over the top as shown.
The lower bar during winding should swing from pointing down to pointing a little past horizontal.
Then you hold that bar horizontal while socketing the other bar pointing down, apply force
to that (now) lower bar, then remove the (now) upper bar, wind one-quarter turn, and repeat.
You can also see I am wearing eye protection. It would be foolish to go bare and risk an eye injury. Somehow I came out looking like Elmer Fudd in this photo. And somebody oughta sweep out those cobwebs! |
|
|
Winding "up" starts out easy. It finishes at the proper number of turns,
by which time you are pushing against the maximum torque.
Count the turns of spring winding from when the springs are slack.
To be sure you're winding the right direction,
all you have to remember is that proper winding makes
the spring smaller in diameter and longer in length as it twists "in".
On the standard door (most common), this means you push the winding bars up
to wind up the spring, which is an easily remembered rule.
This is very apparent and should be verified during the first few easy turns.
You can also think about the correct winding direction in mechanical terms,
namely which way the reaction of the spring
will torque the shaft and drums, which in turn will lift the cable.
This should all make perfect sense before you attempt the manipulations.
If you were to install the two springs backwards in the wrong sides of the center plate, the winding direction that acts to lift the door will be twisting the springs "out", which is backwards. By watching the chalk mark while winding, you can count the number of turns applied, and confirm the number later. My standard-size door (7 foot height) with 4-inch drums has a nominal wind of 7-1/4 or 7-1/2 turns, which leaves 1/4 or 1/2 turn at the top-of-travel to keep the lift cables under tension. After 7 turns on the first spring, I clamped down the set-screws, weighed the door again, and found a lift of about 100 pounds in reduced weight. As expected, this wasn't quite half of the full 238 pounds, nor would it leave any torsion at the top-of-travel, so I added an 8th turn. The door now weighed 122 pounds on one spring, which was ideal. After winding the other spring, the door lifted easily, with only a few pounds apparent weight. This confirmed that the spring choice was properly matched to the door design. I engaged the electric opener trolley, and adjusted the opener forces down to a safer level suitable for the new, improved balance. The door was now ready for return to service. As with the drums, I tightened the winding cone set-screws about 1/2 or 3/4 of a turn after contact with the shaft, which provides a good grip, but does not distort the shaft. One can overwind the springs slightly, up to about 8 turns on a standard residential door (that is, 1/2 or 3/4 extra turns), to compensate for undersized or fatigued springs, or increased door weight from painting or humidity, but this results in more stress on the springs and therefore decreased lifetime. If the door is too heavy for that slight tweak, then different springs are needed. The usually recommended rule for a door being properly balanced is that it should lift "easily" through all its travel. The door may also remain stationary if let go somewhere around the middle of the travel, but a smoothly rolling door many not show this behavior (while a sticky track will!), so easy travel is the only reliable test for proper balance. A difficult door may be due to stiff bearings or rollers in the mechanism, tracks out of alignment, etc., not necessarily the torsion spring adjustment. Another trick for fine-tuning the balance of spring turns versus door weight is to adjust one side of a duplex pair slightly more or less than the other. That way you can have an exact weight balance while retaining some desirable torsion at the top. Once the springs are torqued, the setscrews tightened, and the locking pliers and winding rods removed, do not play with turning the torsion bar using the winding rods. Doing so even momentarily can relieve the tension on the lift cables, which then easily slip off the drums. Replacing the cables on the drums can be difficult without repeating the entire spring unwinding-winding procedure again, and the cables can be damaged if tension is applied while they are off the drums. Total time for me to complete this work the first time was 3.5 hours, including cutting the winding tools and the photography. I've completed subsequent repairs in less than an hour. Hundreds of people have written me to say they did it safely in a few hours after studying this essay. I'd like to hear how it goes for you. |
|
I make no recommendations of, and have no connection to, any of the following suppliers. These are just those whom I have learned about from my Web searches, from correspondence with those sending email about their experiences, or directly from the suppliers. I have removed several contacts that were generating complaints to me from dissatisfied customers. I have added this list to this page due to all the email queries I was receiving daily asking where to obtain parts. If you are a supplier and would like to be added to the list, see my email address at the end of this page.
Current wholesale pricing (2005) for a typical spring (2" ID, 0.2253 wire, 24" long) is less than $10, including cones. Other sizes are proportionately priced by weight. Expect to pay up to three times that for a reasonable retail source, plus shipping.
A fair price for a professional repair, including the service call, parts, labor, and warranty, in most US locales is $100 to $150. This was the case in the early 2000s. Times change.
I have received many tales by email of various swindles for upwards of $800 involving garage door repairs, or $1000s in needless door replacements. Beware of various tricks. Overcharging doesn't announce itself with a big "OVERCHARGE" stamped on the invoice. You have to know and recognize the angles.
The parts, parts, parts trick: You might be told you need new rollers, cables, drums, bearings, etc., when you don't, or at highly inflated prices. Good questions to ask when first calling for service include, "How do I know you will only charge me for the parts I actually need?", and "If you don't have all the parts I need, what will you charge me to come back?"
The open-ended work-order trick: You may be very surprised if you allow work to proceed without signing a work order with a specified price. Or, you may sign a work order, and think you're protected against open-ended wallet-reaching, only to find a much higher price due at the finish than you expected, because you signed a "parts as needed" order that got loaded up with a long list of parts (that likely were still in serviceable condition). You might have been quoted a price, but then get a bill for that price plus a lot more added for the "service call" and the "parts", and be told the quote was just for the labor. While this is the normal way of abusing your finances down at the hospital, you shouldn't agree to it for a garage door service call. These guys are not doctors.
The not-so-competitive advertising trick: How about this racket: We have all heard how you should get at least three bids for any home improvement jobs, right? In some areas the largest ads in the yellow pages are from a single business using various names and phone numbers, masquerading as independent competitors. When you call asking for prices, "they" all quote you very high numbers. You are tricked into thinking you have shopped around for the prevailing price. (The more modern version of this is multiple Web sites that all direct you to call the same person.) If you've ever had to call a plumber you may have unknowingly been a victim of a similar trick.
The optician's trick: The serviceman looks over your door with lots of scowling, chin-scratching, and tsk-tsking. You ask, "how much?" He replies with the fair price. If you don't flinch at that price, he says, "for the parts", while quoting a large additional cost for the labor. If you still don't flinch, he adds, "each," while pointing back and forth to your pair of springs. (I hope none of you service people are reading this!) I call this the "optician's trick" after the old vaudeville joke about lenses, frames, and left/right.
The lucky-for-you-I-found-another-problem trick: Another trick is to suggest your automatic opener was damaged (or "compromised") by the additional load or shock presented by the failure of the spring(s). The plastic worm gear used in the most common openers (see above) wears normally over the years and tends to leave a lot of debris inside the opener housing. Removing the opener cover reveals a lot of plastic shavings that may be cited as "evidence" you need a new opener, when the gears are actually still serviceable. Nevertheless, you may have indeed worn out the gear if you repeatedly cycled the door with the opener despite having broken springs, which is possible if you have a very lightweight door.
The classic telephone bait-and-switch: This time-honored swindle, also called "false advertising", can show up in the garage door business. Here's how this scam works: When you call and say you have a broken spring, and ask for a repair price, you are told over the phone that the price is X dollars, which typically might seem a little better than the competition. When the repairman shows up, after looking at your broken door, he will casually and matter-of-factly tell you it will cost 2X. If they told you over the phone that it would cost X, well, that was only for one spring, and he must (he must, mind you) install not just one, but two. He will act surprised if you object, as if you should have known that from what you were told over the phone. If you expected to really pay just X, it was your fault for misunderstanding because you don't know anything about how garage doors should be repaired. (You will feel intimidated at this, since you honestly don't know anything, else why would you have called a repairman? Intimidation is a powerful tool against customer resistance.) If your door used only one spring to start with, he will insist on converting yours to two, telling you it is safer the next time a spring breaks. If you originally had two springs, he will tell you that he must replace both springs, and you must therefore pay double what was quoted. While it is true that converting or replacing both springs is a good idea, the bait-and-switch pricing is not. The "bait" is the low price quoted to you over the phone, which they never intended to honor, and the "switch" is switching the price to something higher on a pretense. This method of selling is literally criminal (for example, see Florida Statutes 817.44, all states have similar laws), but a service business can usually avoid detection or prosecution because there are no printed advertisements or other tangible evidence, just one-on-one phone calls. If you find yourself in the middle of this trap, then the proper response is to dismiss the repairman without paying a nickel. Don't expect that you will be able to negotiate a fair price with someone who is using criminal business methods. Certainly don't expect that he will accept a lower price because you accuse him of false advertising. If you absolutely cannot wait for another service call, then you'll have to accept the fraud, in which case you should do so quietly. People that use these methods typically have ways to mentally justify their behavior to themselves as a reasonable business practice, and won't react well to your suggesting otherwise, even though they are in fact small-time criminals, not shrewd businessmen.
The special-price don't-tell-my-boss trick: In this scheme, after the technician has worked on your door for a bit, he will grimly notify you that he has discovered an additional repair needed, not just the spring(s). He will offer to do the work at a "special price" if you agree not to tell his boss. This air of conspiracy to get a bargain distracts and disarms you from critically thinking whether you really needed the repair in the first place (likely you don't), and whether the price is really a bargain (likely it isn't).
Before I give any more examples of many deceptive practices in this business, let me say two things.First, I don't know exactly how prevalent these practices are, I just know that they are not uncommon. I'm sure it varies from place to place and time to time. Don't feel that you'll necessarily get taken, and have a chip on your shoulder when you call someone for service.
Second, there are a lot of honest people in this business who will give you good value for your money. While it can be hard to distinguish the honest ones from the opportunists and the outright crooks, being aware of the tricks is the best way to make such a choice from limited information.
The home-warranty trap: I cannot adequately express how worthless home "warranties" are in general. When it comes to garage doors, if you bought a home warranty thinking that it would fix your broken springs or other major garage door problem, then you are in for a costly disappointment.
The "safety issue" trick: Another tip-off is the use of language like "safety issue". This is meant to trump any objections you might have to a costly repair bill. Don't be manipulated by the suggestion that you are risking disaster if you don't buy something expensive. Even if you think the risk is genuine, get another estimate, and tell the second repairman you are skeptical; every technician loves to prove the competition made a mistake.
The salesman-disguised-as-technician trick: In this trick, you arrange for a service call to your home, perhaps paying a small fee up-front, and a neatly uniformed man arrives in a very technical-looking truck, carrying an impressive tool kit. He carefully examines your door, perhaps using some impressive testing devices to lend weight to his expertise. He then condemns your door as not worth repairing, and tells you, to his sincere regret, that you must have a new one. In fact, this technician is not a technician, but a salesman who only sells, and does not repair, doors. Even if he doesn't sell you, he is doing well just collecting fees for service calls that are no more than sales visits. He doesn't actually have to ever fix anything, and he may not even be capable of doing so himself. He's an expert at selling, which genuine technicians are not. In the worst case, when you refuse to buy a whole new door, he might refuse to follow up with a visit from an actual technician, either outright, or only with an unacceptable delay ("we're too busy to get a guy out until next week", when your car is trapped). If you find yourself closing in on this situation, then politely invite him to leave, and try someone else. That is your right, and in fact the only power you have to bargain in such circumstances. At that point, he may offer to promptly bring in his competent colleague, who will turn up lacking charm and looking awful, but might actually do the work, possibly at a fair price. If so, you will have beaten a legal variation of the classic illegal bait-and-switch (see below). The switch was attempted, but not required, which makes this legal. This is a hazard of any direct-sales situation. Because it rarely appears in everyday retail sales, it can surprise the unwary.
The "liability" angle: The flip side of "safety issue" is "liability". This is not used to directly sell you something; it is used to demean the cheaper alternative and prod you into buying a more expensive (and profitable) option. For example, you may be pressured into buying a whole new door, when you just need a new spring, by the salesman telling you he can't just replace the spring due to "liability" issues. Since product liability is a big burden on the garage door industry, and so many old doors (and especially automatic openers) are dangerous, this may be a genuine reason to accept a higher price.
The disaster-is-nigh technique: As he inspects your door, the serviceman grimly calls your attention to "cracks" in your garage door. These appear very faintly in the middle of the door where the panels bow under their own weight when the door is up. This is normal, but the type of thing you wouldn't casually observe yourself. This surprising revelation disarms you, and you may find yourself strangely susceptible to the pitch for an entire new door.
Not-quite-honest advertising: Advertising on the Web and yellow-pages is the most handy source of information when you urgently need a door repair, but it is noisy and deceptive, especially when it comes clueless-consumer items like garage door repairs. I've prepared following table to guide you through the exegesis:
| The Advertising | The Meaning |
| Multiple-name-multiple-ads | All one operation. See explanation in text above. |
| Business name starts with "A", "AA", etc. | Any other random choice is statistically better. |
| Full-page ad. Family owned. No physical address listed. |
One man, one truck, works out of home. |
| More than one or two brand names or logos displayed | No affiliation, but we can get import parts. |
| 24-hour or emergency service | Call us, we might feel like working late if you take the bait and pay the rate. |
| Senior citizen discount, AAA discount, discount for any trivial affiliation you might have. | Starting prices adjusted accordingly. |
| Low prices! | You have no idea what a low price is. |
| $49 (etc.) service call. |
For $49, we'll send a salesman (disguised as a technician, see above)
to sell you a new door, not fix your old one.
or We'll fix it, but the real price will have to wait until we get there, when it will cost you $49 just to say no. |
| Multiple locations, multiple phone numbers. | I work out of home, all numbers forward to my cellphone. |
| Ranked tops in customer service survey. | My mom was the only one voting. |
| Member, Better Business Bureau. | Paid dues to a business in the business of collecting dues. |
| Certified technicians. | Paid certification fee to a business in the business of collecting certification fees. |
| Picture of broken spring. | That's what I have! How did you know!? I'm calling you! |
| Factory authorized. | What "factory"? Is there such a thing as factory-unauthorized? |
| Free safety inspection. | You just pay for the service call. |
| All major brands. | We train ourselves doing your job. |
| Lifetime warranty. | Does not apply to service call. You'll forget about it in a year or two, anyway |
| Free estimates. | Wonder why nobody just publishes a price schedule? |
| Photos of clean-cut men (or cartoon figures) in crisp uniforms and new trucks in front of palatial homes. | Did you want your door fixed, or to look at a stock-photo model? |
You might genuinely need some extra parts when you thought you simply needed a broken spring replaced, and a good serviceman will perform a simple inspection to identify such parts. Nor is it unreasonable for a business to charge separately for a service call versus repair work actually performed. But the best protection for you as a buyer, being somewhat at the mercy of whomever you decide to bring on site, is to understand what is being done, and ask intelligently for a clear explanation or demonstration of why extra parts are required.
Insist on having any old parts returned to you, and have that noted on the written order before work begins. An honest and competent technician will not object to this. The evidence will establish whether you really needed the parts or not, and you can consult another opinion if you have any doubts. This tends to deter the parts-upsell scam, and protects you even if you know nothing about what you're buying while under the pressure of making a costly decision. If the old parts mysteriously "disappear", then you have reason to be suspicious.
The deluxe-model upsell trick: Don't you want the best? Don't you want to protect your family? Galvanized springs may be offered to you at extra expense as "longer lasting". Although bare springs (also called "oil tempered") can develop a light film of rust, the eventual failure is due to fatigue and not corrosion. The use of coated springs (whether galvanized, painted, powder-coated, or surface-converted) is mostly about appearance: the customer likes his new door to look shiny, and the customer doesn't like repair parts that show superficial rust from storage.
Paying for an "extended warranty" is a poor gamble.
A knowledgeable installer with good inventory can offer you upgraded spring lifetimes by using longer, heavier springs than were originally installed. For example, you may be offered more expensive springs with expected lifetimes of 15, 25, or even 100 thousand cycles, instead of the standard 10 thousand. The difference in labor to substitute this upgrade is nil. Since the dealer's cost of springs is proportional to weight, and typically a small part of the job price anyway, the dealer's cost for this upgrade is slight. This would seem to be a excellent option to offer every customer, and if correctly calculated and reasonably priced, one that you should take as cost-effective. Yet you may not be offered such an upgrade, if the installer is not adept at making the rather simple calculations, or if the optional springs are not on his truck, or if you're not around to be asked, or if the installer just doesn't like selling or taking time to discuss such details.
I'm not sure why most doors are installed with 10-thousand cycle springs instead of 25- or 50-thousand, since the difference in cost is minimal. I suspect most people do not want to pay today for extra years of service far in the future. And cynically speaking, the repair biz as a whole is more profitable when the cheapest parts are used.
Clopay, a garage door manufacturer, provides online installation manuals for their products. These include excellent mechanical diagrams and brief instructions for winding torsion springs on their doors. Of course, this is specific to their product designs, which may or may not match what you have. Note that some of their products involve the "EZ-Set assembly option" mechanisms that use a geared housing for winding (instead of standard winding cones) and non-standard geometry for the drums. Clopay should get an award for at least acknowledging in their instructions that you might be able to install your own new door (although they insist you must not take out an old one if it has torsion springs).
See the Sectional Overhead Garage Door catalog (PDF file) from the Prime-Line replacement hardware company. Their brochure Sectional Garage Door Torsion Spring Installation Instructions (PDF file, part number GD-12280) is brief but informative. Apparently you can only obtain their torsion springs as special order items through mom-and-pop type hardware stores like Ace and True Value, and not the big-box Home Depot and Lowes.
DASMA publishes a detailed glossary in Sectional Garage Door Terminology [PDF document],
Two of the spring references specifically for the garage-door industry are the APCO Spring Manual by Bill Eichenberger, and the Torsion Spring Rate Book by Clarence Veigel; these give tables of spring sizes and torque constants. Spring engineering principles in general are described in the Handbook of Spring Design published by the Spring Manufacturer's Institute; the formulas allow you to calculate torque constants knowing only the geometry and the Young's modulus of the material. You can also find some brief spring information in standard references like Machinery's Handbook and Marks' Standard Handbook for Mechanical Engineers.
 Dangerous Bend |
Caution: Advanced material follows. This section is only for the mathematically-inclined and engineering-minded! |
Given the material property and design geometry of a torsion spring, we can use engineering principles to calculate the spring's mechanical properties using the following formulas (after Wahl, A.M., Mechanical Springs, 2nd Edition, 1963; Machinery's Handbook, 26th edition):
| Property | Formula or Constant | ||||||||||||
| Mean coil diameter (inches) | D = (OD+ID)/2 = ID+d = OD-d | ||||||||||||
| Wire size (inches) | d | ||||||||||||
| Young's modulus of the material (psi) | E = 28.5*10^6 psi (ASTM A229 oil-tempered wire) | ||||||||||||
| Density of the material (lb/cu-in) | rho = 0.283 lb/cu-in (ASTM A229 oil-tempered wire) | ||||||||||||
| Number of (active) coils | N = L/d - "dead coils" | ||||||||||||
| Dead Coils | 5 to 10, depending on winding cones | ||||||||||||
| Spring index | C = D/d | ||||||||||||
| Poisson ratio | nu | ||||||||||||
| Shear modulus (psi) | G = E / (2(1+nu)) | ||||||||||||
| Wahl correction factor for stress | Kw = (4C-1)/(4C-4) + 0.615/C | ||||||||||||
| Mass (weight) of spring (lbs) | M = rho * L/d*pi*D * pi*d^2/4 | ||||||||||||
| Spring rate (IPPT) | K = π * E * d^4 / (32*D*N) | ||||||||||||
| Number of turns applied | F = 7.5 for a standard residential garage door | ||||||||||||
| Torque (in-lbs) | T = K*F | ||||||||||||
| Bending stress from torsion, per turn (psi) | S = 32*T/(π*d^3) | ||||||||||||
| Recommended stress limit (after Wahl correction) |
|
(The Wahl correction factor accounts for additional stress in the material due to shear forces, although these forces do not contribute to the spring's torque. These shear forces become significant in designs using a low spring index, which is to say, a relatively thick wire for the coil diameter. The correction factor is applied to scale up the stress S to better predict the fatigue lifetime of the spring.)
Excel spreadsheets: Several readers of this page have contributed Excel spreadsheets they wrote to calculate torsion spring properties based on the formulas above. Download Jay Hahn's spreadsheet. Download Gary Schrock's spreadsheet. Download Bowyer's spreadsheet. Download Ben Franske's spreadsheet.
Note that there is nothing special about torsion springs used for garage doors; the formulas and spreadsheets apply generally to any torsion spring.
Spring properties vary slightly by temperature, since Young's modulus is temperature-dependent. For example, a torsion spring at 0 deg F is about 4 percent stronger than the same spring at 100 deg F.
Example 1:: Let's plug some numbers into the formulas above, using as an example the pair of replacement springs I described above.
Spring rate and torque: In my spring replacement above, the wire size was d = 0.2253 inches, and the ID was 2 inches, giving a mean diameter D = 2.2253 inches. The number of coils is L/d = 24 inches / 0.2253 = 107, less about 5 dead coils on the winding cones, or 102 active coils. Thus the spring rate is K = (π*28.5*10^6 * (0.2253)^4) / (32 * 102 * 2.2253) = 31.8 in-lb/turn (IPPT). Winding 7.5 turns * 31.8 in-lb/turn yields a torque of 238 in-lbs per spring.
Lift: The 4-inch lift drums have a 2-inch radius, so the tangential lift of one spring is 238/2 = 119 lbs. There are two such springs, so the total lift is twice that, or 238 lbs. This agrees with with my weighing of the door at, remarkably, 238 lbs.
Stress and lifetime: Calculating the maximal stress in the wire is useful for estimating the lifetime. Using the formula above, the bending stress S in the spring wire is 32*238/(π*0.2253^3) = 212 Kpsi. The spring index C is D/d = 2.23 / 0.225 = 9.88. The Wahl correction factor is Kw = (4C-1)/(4C-4) + 0.615/C = 1.15. The Wahl-corrected stress is Kw * S = 1.15 * 212 Kpsi = 244 Kpsi. This predicts about a 10,000-cycle lifetime, which is the standard "cheap spring" configuration originally installed. Note that while this stress is proportional to the torque being applied, it is also in proportion to the inverse third-power of the wire size. Thus slightly heavier wire sizes (and suitably adjusted D and/or L) radically improve the expected cycle lifetime of the spring.
Weight and cost: The 24-inch-long spring has a calculated weight of 8.4 lbs, not counting the winding cones. At less than $1/lb wholesale, and $3/lb retail for fabricated steel products, this spring should sell for about $8 to $25 (2005 prices) each, depending on the market and source. Since a pair is required, the expected cost for a pair is $16 to $50.
Spring stretch: When the door is at the top of travel, the spring(s) are hardly wound, but are stretched, so on a single-spring installation this stretch tends to pull the shaft towards the non-spring side. With two springs, the stretch tends to cancel out. This top-of-travel spring stretch, being about 7 or 8 turns of the wire, will thus amount to upwards of about 2 inches on a typical size spring of 0.253 wire. This spreads out to a gap of about 0.020" per coil on a typical 100-coil spring, so the stretch is not very visible.
Example 2:: As another example, let us analyze the 25-year-old original spring that is still intact on the least-used of my three garage doors. This is a single spring instead of a duplex pair such as has since replaced the originals on the other doors.
Measurements: With the door in the down position, I measure a wire size of 0.273 inches, outside diameter of 2.0 inches, and overall length of 41.5 inches. Relaxing the spring shortens the length by about 7.5 coils of wire, so to estimate the relaxed length, we deduct the wire diamter of 0.273 inches times 7.5 from the 41.5 inch wound length, yielding an estimated relaxed length of 39.5 inches. The mean coil diameter is 2.0 - 0.273, or 1.73 inches. Perhaps this was actually a 40-inch-long spring with a 1.5 ID, 1.75 mean diameter, and 2.0 OD, but let's continue on calculating with the actually observed sizes. The number of coils in the relaxed spring is the relaxed length of 39.5 inches divided by the wire size of 0.273 inches, or about 145 coils. Deducting about 5 dead coils at the ends yields 140 active coils.
Spring rate, torque, and lift: The spring rate K for these measurements is π*28.5*10^6 * (0.273)^4 / (32 * 140 * 1.72) = 64.5 IPPT. Applying 7.5 turns on this rate will yield a torque of 7.5 * 64.5 = 484 in-lb, which on the 4-inch drums (2-inch radius) yields a lift of (484 in*lbs)/(2 in) = 242 lbs. Again we find good agreement with the approximate door weight of 238 lbs.
Stress and lifetime: Spring index C = D/d = 6.2. Wahl correction factor Kw = (4C-1)/(4C-4) + 0.615/C = 1.24. Stress S = 32*484/(π*0.273^3) = 232 Kpsi. Wahl-corrected stress = Kw * S = 242 Kpsi. The stress limits in the formula table above show this to be another 10,000-cycle spring like the paired replacements on my other doors.
Weight and cost: The 40-inch-long spring has a calculated weight of 13.3 lbs. This single spring should retail for about $40. This is bit cheaper than the example of paired springs above at $50, but the lifetime is shorter.
Trading diameter for length: Observe that in the spring rate formula in the table above, factors D (diameter of coils) and N (number of coils) appear together in the denominator of the spring rate formula. Algebraically, given equal wire sizes, this means that the product of the coil diameter and overall length produces the spring torque, not the diameter or length alone. Physically, this means that you can trade off torsion spring coil diameter versus overall length in inverse proportions to maintain the same torque rate. Trade-off example: A spring with 2-inch diameter coils that is 36 inches long equals a 1.5-inch diameter spring that is 48 inches long, because the product in both cases is 72 (inches squared). This assumes that wire size is equal in the trade-off, and that you have not counted dead coils in the length. Service technicians use this principle to make quick substitutions for what's on their truck versus what you need. But if you understand this, you're ahead of many technicians who don't know this trick. Maybe now you can educate the next one you hire.
Cycle lifetime unchanged by diameter-versus-length tradeoffs: Since the material stress (and thus cycle lifetime) for equal torques varies only with d, and not D or N, trading coil diameter (D) for spring length (N) in this fashion has no effect on cycle lifetime. Long and skinny, versus shorter and fatter, they'll wear the same if they have the same wire size and diameter-length product. The game of life is all about wire size when it comes to springs (see below).
Spring index lower limit: DASMA standard 102-2004 provides a lower limit of 6 for the spring index, which is symbol C in our formulas above (section 9.3). Other interesting items in this standard include an upper limit for how much the door sags when raised (no more than 1/120 of its width, section 9.2.1), that each of the two bottom brackets should sustain twice the door assembly's weight (section 9.2.2) for a total safety factor of about 4, and that the lift cables should provide a safety factor of 5.
Trading wire size for length, diameter, or cycle life: Now we are really going to save you some money, if you just recall your high school algebra class (and I don't mean that cute cheerleader who sat next to you). If you further understand the role of the 4th power of the spring wire size (letter d in the formulas above) in the numerator of the spring rate formula, and how to increase or decrease d to compensate for changes in length, diameter, and cycle life, then you're qualified for elite spring calculations. Matching springs is a matter of equating the 4th power of the proportion in wire size change to the proportion of change in the diameter or length or the product of both diameter and length. However, it is usually best to only increase wire size when substituting a spring, since this does not derate the cycle life. If you observe that the formula for bending stress is proportionate to the inverse 3rd power of the diameter, then physically a proportionate increase in wire size will result in a dramatic increase in cycle life of the 3rd power of that proportion. Trade-off example: Yawn with me while we ponder my original spring once more. Let's say I was in a fit of engineering mania, and wanted to replace my spring having a 0.2253 inch diameter wire (d = 0.2253) with a 0.262 wire version (d = 0.262). How much longer is the spring with equal torque rate, assuming we use the same coil diameter? The proportion of this change is 0.262/0.2253 = 1.163, and the 4th power of that is 1.83. This means the length must increase by a factor of 1.83 (again, not counting dead coils). Recalling that the length in Example 1 was 102 non-dead coils, the heavier wire spring must be about 1.83*102 = 187 coils, which when adding 5 dead coils and multiplying by the wire size to get the overall length, is (187+5)*0.262 = 50 inches, versus 24 inches in the original. So using this heavier wire more than doubles the length (and thus the mass and thus the cost). While the cost about doubles, the stress goes down by the inverse 3rd power of the wire size proportion, or 1/(1.163**3) = 0.64. Sress is favorably, non-linearly related to cycle lifetime (halving the stress more than doubles the lifetime), so this decreased stress should more than double the expected lifetime of the spring. While the up-front cost is more, the true cost of an amortized lifetime is much less. In short, per cycle it is cheaper. Ah, the wonders of engineering calculations! Conclusion: Observe that the stress formula (and thus the cycle lifetime) depends only on wire diameter (d) for equal torques. Thus the only way to improve cycle lifetime is to use heavier wire. For equal torques, heavier wire size, due to the exponents in the formulas, increases cycle lifetime much faster than it increases mass (and thus cost), physically speaking.
Door repair business advice (warning to consumers, you are not allowed to know this): Thinner wire is excellent for shortening spring lifetimes, lightening your inventory on a service truck, and getting paid for frequent service calls. This is why your industry chooses to set "standard" springs to have thin wire and despicably short lifetimes. If you want to maximize profits and fleece your customers, install springs that predictably break in about 7 years on a door that should last decades, even though it is just as easy for you to install slightly more expensive springs that should last the life of the door. Remember that the customer wanted the cheapest price, so you need not feel any guilt about this low-balling.
Example 3:: By way of comparison, here are some sample values from a spring rate book used by garage door installers; put the same parameters into the formulas above to see how the theoretical and practical values of the rate in IPPT agree.
| Spring Length L (inches) | Rate K (IPPT) | Max turns (10K cycle lifetime) | Weight (lbs) |
| 17 | 31.7 | 6.7 | 5.42 |
| 18 | 29.9 | 7.1 | 5.74 |
| 19 | 28.2 | 7.5 | 6.06 |
| 20 | 26.7 | 7.9 | 6.38 |
| 21 | 25.4 | 8.4 | 6.70 |
| 22 | 24.2 | 8.8 | 7.02 |
| 23 | 23.1 | 9.2 | 7.34 |
| 24 | 22.1 | 9.6 | 7.66 |
| 25 | 21.1 | 10.0 | 7.98 |
| 26 | 20.3 | 10.4 | 8.30 |
| 27 | 19.5 | 10.9 | 8.61 |
| 28 | 18.8 | 11.3 | 8.93 |
| 29 | 18.1 | 11.7 | 9.25 |
| 30 | 17.5 | 12.1 | 9.57 |
| 31 | 16.9 | 12.5 | 9.89 |
| 32 | 16.4 | 13.0 | 10.21 |
| 33 | 15.8 | 13.4 | 10.53 |
| 34 | 15.4 | 13.8 | 10.85 |
| 35 | 14.9 | 14.2 | 11.17 |
| 36 | 14.5 | 14.6 | 11.49 |
| 37 | 14.1 | 15.1 | 11.80 |
| 38 | 13.7 | 15.5 | 12.12 |
| 39 | 13.3 | 15.9 | 12.44 |
The mechanics of a garage door system is a more elaborate case of the classic half-Atwood machine in introductory physics. The static forces in the system as a function of the state (that is, the position up or down, or in between) are easier to calculate than the dynamic behavior, which is surprisingly complicated even in an theoretical Atwood demonstration. The theoretical Atwood machine is simply two masses connected by a massless string on a frictionless pulley, while the door is a segmented, hinged, distributed mass riding in a low-friction track. The movement of a theoretical door with frictionless track and hinges would require a complex system of algebraic equations to properly model, and introducing the real factors of friction in the hinges and tracks would add additional complications.
I've provided this information for free, in hopes it will help you either fix your door yourself, or find a competent professional service to do it for you at a reasonable price. If you've been helped by this Web page, as many have, all I would ask is that you create a link to this page (http://www.truetex.com/garage.htm) from any pages you maintain. You will thereby help others searching for complete and reliable information on this type of repair to find it with a Web search.
Please address any publication or reprint permission requests to me via email at the address below.
Copyright 2002, 2003, 2004, 2005, 2006, 2007, 2008, 2009, 2010, 2011, 2012, 2014, 2015 Richard J Kinch
