INSTALLING AND OPERATING THE
KOWA fx-50R LOWER PORT OR
KOWA fx-500 UPPER PORT
DIGITAL CAMERA UPGRADE KIT
Richard J Kinch
http://www.truetex.com
November, 2011.
This document describes how to install and operate
the digital camera upgrade kit for the lower port of the
Kowa fx-50R series retinal camera, or for the upper port of the Kowa fx-500.
Installation differs on the fx-50R model versus the fx-500 model (sometimes designated fx-500S)
only in the position of the adapted port, whether lower (below the viewfinder
as on the fx-50R) or upper (above the viewfinder, as on the fx-500).
The adapters for these various models differ optically, but are essentially identical in their electronic
and mechanical interfaces.
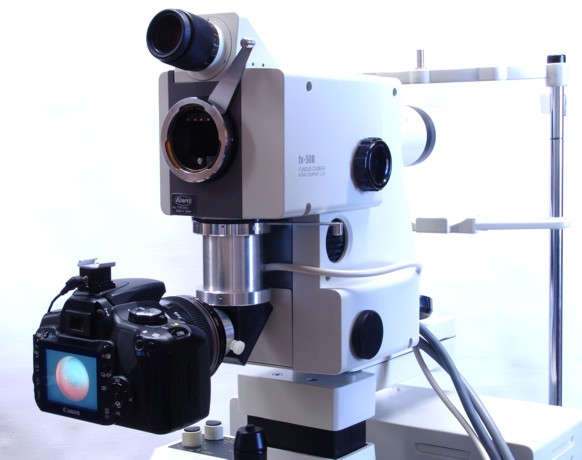
Figure 1. Digital camera with adapter mounted on the lower port of the Kowa fx-50R retinal camera.
Rear orientation of the adapter original version shown.
Later versions mount only to the left or right orientations due to clearance of the larger diagonal assembly.
A stock Canon lens provides superb optical performance for relaying the Kowa image to the Canon digital sensor.
The spatial resolution and color depth of the digital system exceeds that of 35mm or Polaroid film, and
captures sharper details from the Kowa retinal camera optics.
Flash energy is lower and more comfortable for the patient.
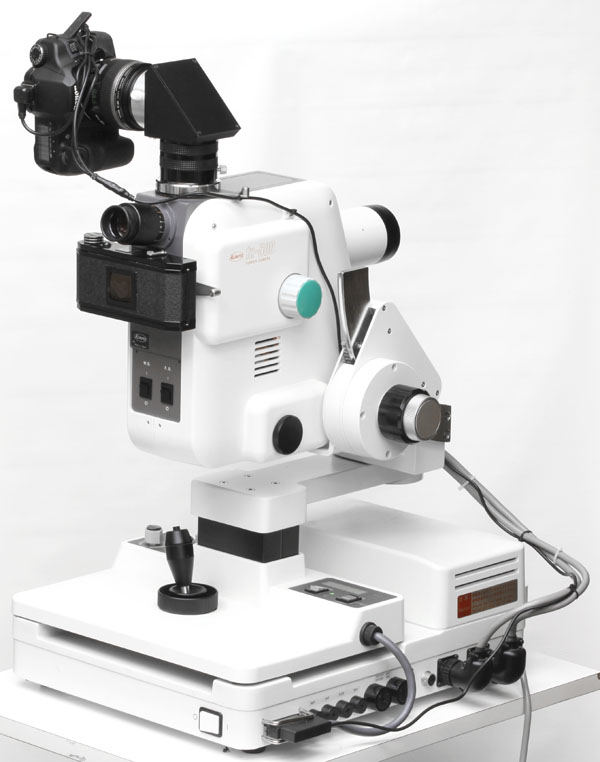
Figure 1. Digital camera with adapter mounted on the upper port of the Kowa fx-500 retinal camera.
Left orientation of the adapter shown.
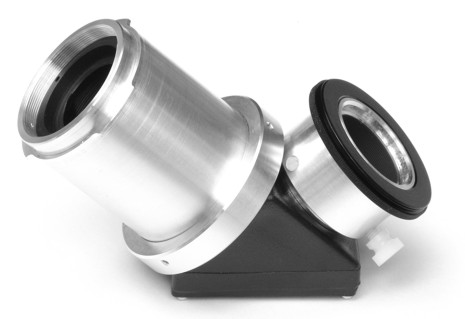
Figure 2. Adapter shown separately. Kowa bayonet is to the left, with the circular black field stop inside.
Canon lens attachment is at the right, ending in a 52mm filter thread fitting.
Each end of the current version provides a rotation adjustment using locking thumbscrews.
The earlier version (shown) provided
a thumbscrew and setscrew to adjust the orientation of the Canon end, and
small black setscrews inside the large aluminum ring adjust the orientation of the Kowa end (using a supplied
1.3mm hex key).
The front-surface precision diagonal mirror in the middle reverts the retinal image to normal orientation.
The optional field lens is not installed in this photo.
Current versions of the adapter use a larger, sturdier diagonal mechanism.
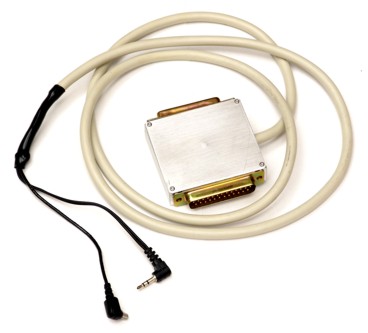
Figure 3. Electronic interface cable.
This component consists of a connector block for the Kowa instrument on one end, digital camera connectors in a
"Y" arrangment on the other end, and a length of cable in between.
DB-25 connectors on the aluminum housing of the connector block insert between
the similar connectors on the Kowa instrument base to interpolate the joystick and flash sync signals.
Two small connectors on the other end of the cable supply remote actuation to the Canon digital camera shutter
from the Kowa joystick, and the flash sync signal from the Canon camera to the Kowa flash trigger.
The Canon remote connector shown is a 2.5mm mini jack used with the Canon Digital Rebel models.
For the Canon models 40D or 50D, we supply a Canon N3 remote shutter connector instead of the mini jack.
Identify the upgrade kit contents:
- Custom digital camera adapter optical assembly including Kowa bayonet with diagonal mirror and threaded attachment to camera lens.
- Custom electronic interpolation cable for the Kowa joystick and Kowa flash synchronization.
- Optional field lens glass element.
- Solderable jumper wire for Kowa circuit board connector modification.
- These instructions.
Other components you must obtain separately:
- Screwdriver, fine-tip soldering iron, and a bit of rosin-core solder (to slightly modify a connector inside the Kowa unit).
- Canon EOS digital SLR camera. Any Canon EF-S lens-mount model is compatible with the Kowa adapter,
including the Digital Rebel series and the 40D and 50D models. Full-frame models such as the Canon 5D or
Canon 5D Mark II are not compatible, since they do not accept the required Canon 60mm macro lens.
- Canon EF-S 60mm F/2.8 Macro USM lens. This is the only lens mechanically and optically compatible with the adapter.
- Memory card(s) for the camera.
- AC power supply for the camera (if you wish not to depend on battery power).
The adapter kit works by design with ordinary, standard Canon retail camera bodies and lenses,
and with the constantly improving standard computer software supporting digital photography.
No special version or modifications of hardware or software are required.
New Canon camera models in the future should also be compatible, as should
advances in Canon and third-party computer software support.
You may process the standard RAW or JPEG images using industry standard software such as Adobe
Photoshop or Corel PhotoPaint.
Optional components you may wish to obtain separately:
- Computer and software for post-processing and viewing digital photos.
- Computer and software for live PC preview as you photograph ("tethering").
Canon includes software for this purpose with their digital SLR cameras, or you may wish
to use a studio photography application such as DSLR Remote Pro
(http://www.breezesys.com/DSLRRemotePro/).
- An enhanced memory card providing wireless networking for instant transfer of photos
to your network storage server as you shoot.
Familiarize yourself with the digital camera and lens:
If the digital SLR camera is new to you, study at least the following features which
will be used for retinal photography: On/off switch, mode switch "M" setting for manual operation, setting manual exposure time,
attaching and removing lenses, remote shutter release connector,
viewing photos on the camera, transferring photos to a computer.
Also read the instruction manual for the Canon 60mm lens to learn about the following
features of the lens: filter mounting thread, focusing ring, focus mode switch, and distance scale.
You must understand these features to apply the manual focus calibration procedure below, which is
mandatory for proper operation of the adapter.
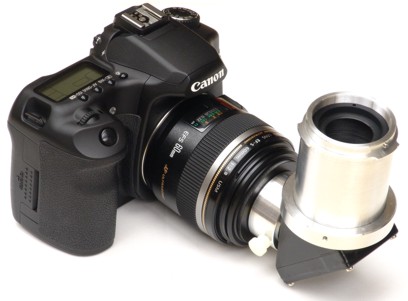
Figure 4. Adapter shown attached to the Canon camera with Canon 60mm lens.
Optional field lens is not installed.
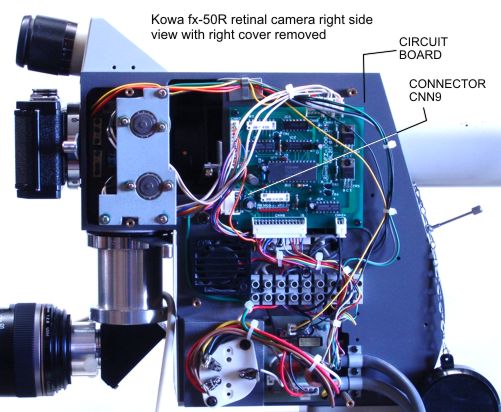
Figure 4a. Kowa fx-50R retinal camera with right cover removed.
Observe circuit board thus exposed on the fx-50R, and location of connector CNN9 on the circuit board.
On the fx-500, see photo below for the relevant connector.
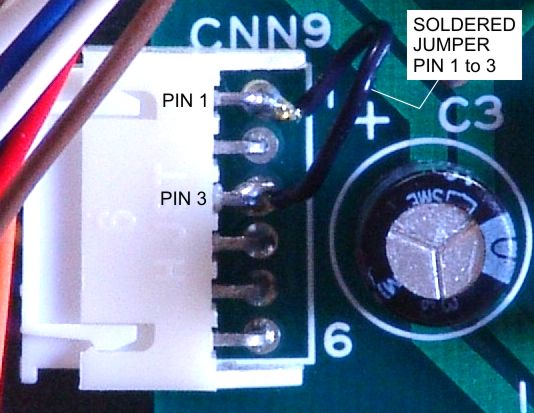
Figure 4b. Close-up photo of connector CNN9 on the Kowa fx-50R circuit board.
On the fx-50R, modify connector CNN9 by soldering a jumper from pins 1 to 3.
On the fx-500, see photo below for the similar modification.
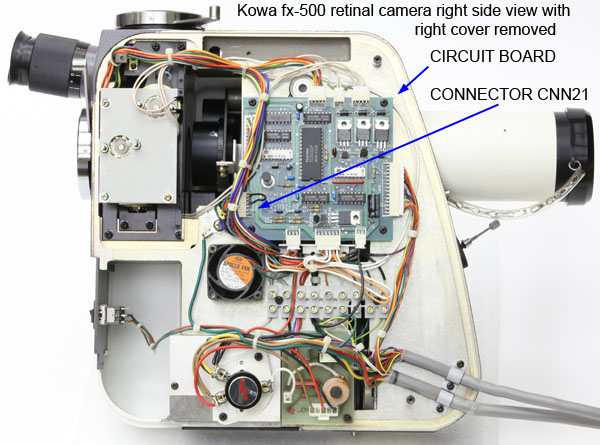
Figure 4c. Kowa fx-500 retinal camera with right cover removed.
Observe circuit board thus exposed, and location of connector CNN21 on the circuit board.
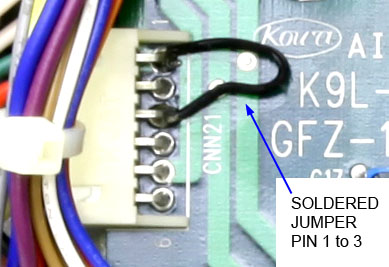
Figure 4d. Close-up photo of connector CNN21 on the Kowa fx-500 circuit board.
On the fx-500, modify connector CNN21 by soldering a jumper from pins 1 to 3.
Modify the Kowa circuit board connector to enable the lower port: This modification permits
the lower-port accessory to operate without having to make an electrical connection through the
adapter itself.
- Turn the instrument off and disconnect the AC power cord. Hazardous voltage may otherwise be present inside the instrument.
- Some Kowa models were equipped with an adjustable tilt axis on the upper unit carriage.
You may identify this feature by the large round knob on the right of the upper unit carriage, which adjusts the
tilt up and down.
If your instrument has this feature, temporarily remove the upper unit from the swing arm by removing the three hex socket-head
cap screws (M5x0.8-12 SHCS, 4mm hex key) beneath where the bottom center of the upper unit attaches to the swing arm.
This allows you to access the right cover in the next step.
If you do not have the tilt feature, you can access the cover directly, without removing the upper unit attachment.
- Remove the right focus knob:
On the tilt version, pry off the green center cover and remove the 9mm hex nut.
On the non-tilt version, loosen the setscrews.
- Remove the right cover of the instrument by removing the
following screws holding the cover to the instrument chassis:
On the fx-50R, remove six screws (M3-6 phillips) on the right side of the cover.
On the fx-500, remove three screws (M3-6 phillips) on the right side, one screw (M3-6 phillips) on the bottom,
and one smaller screw (M2-6 phillips) on the rear of the cover.
- Observe the Kowa circuit board revealed by removing the right cover, connector CNN9 (fx-50R) or CNN21 (fx-500) on the rear of the circuit board,
and pins 1 through 6 indicated on the circuit board for this connector.
See Figure 4a (fx-50R) or Figure 4c (fx-500) above.
- On the fx-50R, temporarily remove connector CNN7 from its socket, and move it to where its wires are not in the way of accessing CNN9.
- Temporarily remove connector CNN9 (fx-50R) or CNN21 (fx-500) from its socket, and move it to where the soldering operation will not affect it.
- Using forceps or needle-nosed pliers,
bend the ends of a solderable jumper wire (supplied) to terminals 1 and 3 of the CNN9 (fx-50R) or CNN21 (fx-500) connector posts where
the posts bend and attach to the circuit board.
See Figure 4b (fx-50R) or Figure 4d (fx-500) above.
- Solder the jumper wire to the connector posts, using a minimum of heat and solder to ensure a sound solder joint.
- Replace connectors CNN7 and CNN9 (fx-50R) or CNN21 (fx-500) in their respective sockets.
- Replace the instrument cover, screws, and focus knob.
- If you removed the upper unit from the swing arm, reattach it with the three socket-head cap screws.
Attach the adapter to the Canon camera:
Calibrate the focus of the Canon camera to the adapter:
Focus calibration is a quick and easy procedure, but it is absolutely critical to the proper
performance of the adapter.
You must set the digital camera lens to a fixed, manual focus on the adapter's circular field stop, which
permits you later to focus the retinal image in the normal way, using only the Kowa focusing knobs.
-
If the adapter and camera are attached to the Kowa instrument, remove them
from the Kowa instrument by releasing the bayonet lock lever on the
Kowa lower port.
-
Look into the Canon camera viewfinder
and obtain a clear focus by turning the Canon viewfinder diopter adjustment wheel so that you see the focusing squares in the
Canon viewfinder clearly (see "dioptric adjustment" topic in the Canon camera Instruction Manual).
-
Push the AF/MF (automatic/manual) focus mode switch on the Canon 60mm lens to the MF (manual focus) position.
Always leave this switch in the manual focus position when you are using the camera on the Kowa adapter.
-
Look into the Canon viewfinder while you point the open end of the adapter towards a bright, diffuse
light source such as a well-lit white wall. Turn the manual focus ring on the Canon 60mm lens and observe
the adapter's circular field stop come into focus near the 1:1 indication (0.66 ft or 0.2 m) on the distance scale on the lens,
which is the extreme close end of the focusing range. Adjust the focusing ring so the edge of the field stop is
in sharpest possible focus.
-
Semi-permanently lock the focus ring by applying a piece of Scotch tape or a snip of self-adhesive paper label across
the lens body where the silver ring meets the gold "ULTRASONIC" band. This keeps the manual focus locked
on the calibration you have just set.
-
Check the focus in the viewfinder, now locked with the bit of tape you applied, to make sure that the
field stop aperture is still sharply in focus. If you inadvertently moved the focusing ring while applying
the tape, remove the tape and repeat the focus calibration and tape-locking.
-
The clarity of all subsequent digital retinal photos depend on a proper manual lens focus calibration.
Once the focus calibration is properly set and locked, you should not have to peform the calibration again.
If you find your retinal photos are consistently out of focus, yet you are sure your technique with the
Kowa instrument and its focus are correct, check the Canon lens focus calibration and recalibrate if needed.
-
You may remove the Canon camera and/or lens from the Kowa adapter to use them for ordinary photography,
but you must repeat this manual focus calibration and tape-locking if you remove the tape from the lens
and lose the Kowa focus calibration.
Attach the digital camera with adapter to the Kowa instrument:
-
On the lower port of the Kowa instrument, pull the Kowa bayonet locking arm all the way towards you,
which is the fully released position.
(This will allow you to remove the old film camera, if one is attached to the lower port of the Kowa instrument.)
-
Observe the orientation of the bayonet on the adapter, such that the tiny screw head near one of the bayonet
ears is pointing forward, directly away from the digital camera. This screw head engages the alignment slot
on the Kowa bayonet receptacle on the lower port of the Kowa instrument. If the screw head is not oriented
forward, loosen the three setscrews in the adapter using the 1.3mm hex key (supplied), rotate the bayonet barrel
to the proper orientation, and tighten the setscrews.
-
Carefully insert the adapter bayonet into the Kowa bayonet receptacle, properly engaging the bayonet ears and alignment slot,
and push the Kowa bayonet locking arm forward (away from you) to lock the adapter to the Kowa instrument.
Figure 5. Electronic interface cable inserted ("interpolated") between original Kowa connectors.
This photo shows the lower-right rear corner of the instrument, by the on-off power switch.
The length of the new cable is routed along the existing cables and up to the new digital camera.
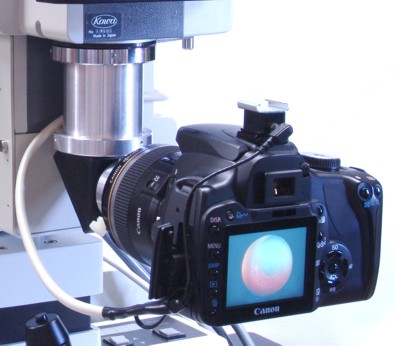
Figure 6. Electronic interface cable attached to the Canon digital camera.
This shows a Canon Digital Rebel model XTi camera with hot-shoe adapter on top for
the flash sync connection. The flash sync connection runs above the Canon camera
viewfinder and into the hot-shoe adapter. Later versions incorporate the hot-shoe
connector into the cable, instead of through a separate adapter.
The remote shutter connection (2.5mm mini jack for this model) goes inside the rubber
flap shown open on the left side of the camera body.
The new cable is routed between the Kowa upper unit and the adapter barrel.
Install the electronic interface cable on the Kowa instrument:
-
On the lower-right rear of the Kowa instrument, separate the DB-25 connector and cable from the base of the instrument.
(This is the connector "guarded" by two shiny silver rails, as shown in Figure 5 above.)
Two locking clips may be holding the plug connector on to the socket connector, requiring that you first pull the clips loose with a small
hook to be able to separate the connectors.
-
Insert the electronic interface cable connector block between the connectors you just separated.
Observe the appropriate connector pairings, such that plugs and jack mate, and that the new cable
runs forward (towards the patient) out of the connector block.
The side of the connector block having the screws and lid goes down.
See Figure 5 for the proper orientation.
-
Route the loose end of the cable to the digital camera.
Route it along the existing cables, up the right side of the upper unit of the Kowa instrument,
then around behind the upper unit betweeen it and the adapter bayonet barrel, and finally around to the
left side of the digital camera. You may wish to use cable ties to dress the new cable to the old cables.
Leave enough slack to allow the upper unit to raise fully up and down, and swing fully left and right.
-
Connect the remote shutter and flash sync connectors to the digital camera. The remote shutter connector is located on the digital
camera under a rubber flap which you must open.
The flash synchrnization portion of the cable connects to the hot-shoe connector on top of the digital camera.
Configure the Canon camera for retinal photography:
- Use a fully-charged battery or external AC power supply.
- Power switch: ON
- Mode dial: M (manual)
- Exposure time: 1/4 SEC
- ISO speed: ISO 100 (or ISO 64 or other lower speed, if available on your camera model)
- Aperture: F2.8
- Memory card inserted
- Connect and start the computer and tethering software if so equipped
Configure the Kowa instrument for digital photography:
- CAMERA switch: to LOWER.
- EXP MANUAL dial: Start with setting 1 (lowest manual setting, not AUTO).
Adjust higher as needed (or raise the digital camera ISO speed setting) for specific eyes.
Adjust the instrument for a fixed test subject:
Tape a business card or other flat, high-contrast, detailed subject to the patient headrest to serve as a fixed test target.
A long strip of clear packing tape stuck across the headrest poles at the canthus marks will serve well.
Stick the tape to the operator's side of the poles, and stick the card
slightly to one side, roughly offset to where a patient eye would be position.
Frame and focus a view of this target using
the Kowa viewfinder in the normal fashion, perhaps pulling away from the subject and
using the "+" refraction compensation, as for anterior segment views.
Take test subject exposures:
Focus and align on the test subject using the instrument viewfinder in the usual way.
Press the joystick button to trigger an exposure.
At the moment of exposure, listen for the Canon camera mirror flip and shutter mechanisms operating,
along with the Kowa mirror mechanism flipping.
Observe the light of the retinal camera flash on the subject.
Immediately after the exposure, the Canon camera should momentarily display a view of the image on the
rear display.
Review test subject exposures:
If you are using a tethered PC to capture photos, refer to the tethering software user manual for
image review.
If you are using the stand-alone camera to shoot onto the camera's memory card (with no tethered PC),
use the Canon menu buttons to manually review exposures on the camera display.
You may lengthen the automatic review time with the "Review time" menu setting on the digital camera.
Zoom in when reviewing images to verify that image is sharply in focus when the viewfinder was also in focus.
Note that the full resolution of the digital camera is much finer than the instrument resolution, so
the highest-resolution images will not appear in focus when zoomed in completely.
Take live subject exposures:
It is most convenient to obtain a cooperative, well-dilated colleague or patient for your first live retinal digital image tests.
Collimate and focus on the retina in the usual way with the viewfinder, using the joystick button
to take exposures. Check the images for exposure brightness and adjust the Kowa flash intensity (that is, the Kowa "EXP MANUAL" dial) to
compensate; the digital camera may be more sensitive than the usual film and lower flash intensity
is usually indicated.
Establish your practice routine:
After completing the above, you will have a powerful digital facility for retinal photography.
You must now handle digital data where you used to handle 35mm film slides or Polaroid prints.
It most regards the digital methods are quicker, easier, and cheaper than film, but do require
an initial investment in careful design and training. Your digital system is based on standard digital cameras, and so is
compatible with ordinary software for capturing, post-processing, and cataloging digital photographs.
Your upgraded digital retinal camera should, with occasional maintenance, provide decades of
reliable service.
Further Notes
Alternate orientations:
By loosening the screws on the adapter, you may turn the fittings on the
adapter to set an optional left or right orientation of the assembly, as shown in Figure 7 below,
instead of the rear orientation shown in Figure 1 at the start of this document.
Later versions of the adapter are of a heavier construction which only permits the right or left orientation.
The right and left orientations allow the operator to be closer to the Kowa viewfinder and the patient.
You must adjust the cable slack to allow for more or less movement in the given orientation.
On the fx-500, the upper port attachment further allows you to optionally
orient the camera to the front of the instrument with the digital camera inverted,
instead of to the side.
While it is also possible to orient the digital camera upright and to the rear, above the
viewfinder eyepiece,
the digital camera body will likely interfere with the observer's head prevent approaching the
viewfinder.
Adjustment for odd orientations are possible, but the image will be rotated in the photograph
and no longer upright.
For example, you may position the adapter for the right orientation, but rotate the camera to
be horizontal (instead of on its right side as shown in Figure 7). This will rotate the image
in the camera by 90 degrees into a portrait orientation. It may be more convenient to have the
camera controls upright with the photos rotated rather than vice versa.
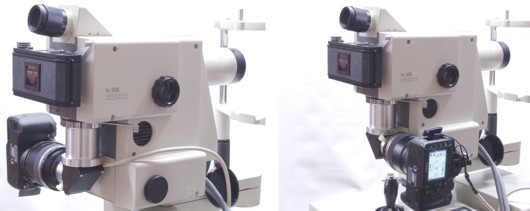
Figure 7. Optional orientations of the adapter on the Kowa instrument.
The adapter and camera may be adjusted for the left or right orientations shown here,
instead of facing the operator.
The digital camera must orient as shown, instead of being upright,
to keep the photographic image upright instead of rotated, as a consequence of the
rotated mirroring path.
Internal Kowa circuit board modification required for the lower-port adapter:
The lower-port adapter does not use the "pogo stick" terminals on the bayonet connection,
and thus requires the modification to an circuit board connector CNN9
to "cheat" the camera-present signal. We will have installed this modification on your
instrument if you sent it physically to us for refurbishment and upgrade. If you are
performing a do-it-yourself field installation of the upgrade, follow the instructions
above to implement this modification. The modification is reversible and backwards-compatible
with lower-port attachments such as the original Polaroid camera which Kowa supplied.
Using the optional field lens:
We have provided in the adapter kit a single-element glass lens which you may install
in the Kowa end of the adapter. This will allow you to use smaller aperture settings
in the Canon 60mm lens than the widest F2.8 setting, should you need to reduce exposures
below the lowest flash energy setting of the Kowa instrument and slowest ISO speed setting of
the digital camera. Without this lens in place, smaller apertures in the Canon lens
(for example, F4.0 or F8.0) will cause vignetting in the image (the edges of the field
of view will be gradually blacked out). With the optional field lens in place, any smaller aperture
setting down to the smallest provided by the Canon 60mm lens (namely, F32) may be used
without vignetting. This less light-sensitive adjustment of the camera is not normally
needed, since the Kowa EXP MANUAL control adjusts the flash energy to very low levels, but
the option is available. Most applications therefore do not require the optional
field lens, and you should thus not normally install it, since it inevitably gathers dust that,
until cleaned off, tends to cause distracting specks on every photograph.
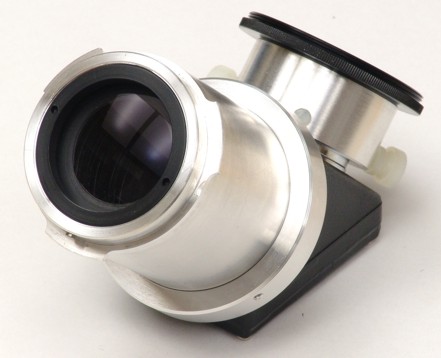
Figure 8. Optional field lens which you may install in the Kowa end of the adapter.
The black circular opening behind the lens is the field stop.
The black ring with two holes is the retaining ring.
Normally this lens is not used, and the adapter tube is open on this end
through the retaining ring and field stop.
To install or remove the optional field lens:
- Remove the adapter from the Kowa instrument.
- Unscrew the black plastic retaining ring inside the bayonet barrel (use a tiny jeweler's screwdriver tip to engage the holes in the ring edge).
This ring is separate from the black plastic ring which is the field stop aperture.
See Figure 8 above to see the lens held in place between the retaining ring and field stop.
-
The new lens as supplied to you should be clean and nearly dust-free.
Handle the lens only by the edges, and use dust-free gloves if available.
You may remove any dust with a canned-air duster, but take care not to blow any
liquid refrigerant from the duster onto the lens, which will cause "frostbite" that will permanently spoil the anti-reflective
coating (hold the duster steady on a table top and wave the lens in front of it, instead
of waving the duster).
You should clean the lens as needed: the slightest dust, fingerprints, or contamination will be prominently
magnified in every photograph, since the field lens is close to the exiting focal plane of the instrument.
- Observe that the lens is a meniscus type, with one side concave and the other side convex.
- Place the glass lens in the barrel with the concave side against the field stop aperture,
and the convex side facing out the open end of the barrel toward the Kowa instrument.
- Screw the black plastic retaining ring back into the barrel to hold the lens in place.
Take care with the fine threads on a large diameter, which are easily cross-threaded.
Push the tip of the screwdriver alternately against the two holes to apply just enough torque to secure the ring against the lens.
Do not overtighten as this will make the ring difficult to remove later.
- Cleaning will be required when dust specks appear consistently in photographs.
Use the above dusting procedure.
Removing the adapter from the instrument introduces dust, so avoid this
except when necessary, such as for cleaning.
- Removal of the optional field lens from the adapter is the reverse of installation.
Store the lens in the lens tissue and envelope provided.
Figure 9 below shows a later design for the adapter tube which uses a heavier elbow component
resulting in a studier assembly.
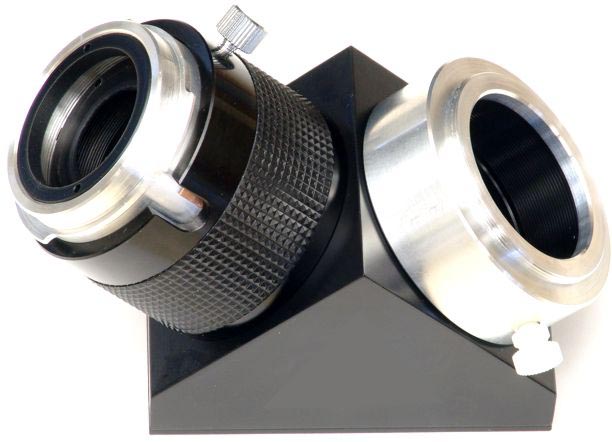
Figure 9. Later design of the adapter tube with heavier elbow component.
The instrument is effectively a manual lens:
The Kowa instrument in effect becomes a manual lens for the digital camera.
The Canon lens is set at a fixed focus and acts only as a relay lens.
Adjusting the ISO speed of the digital camera:
The Canon digital cameras offer a range of ISO speeds, from 64 or 100 up to
800 or 1600. This provides you another variable affecting the exposure
of the digital photograph, along with your ability to vary the Canon lens aperture
and the flash energy on the Kowa instrument.
Higher speeds of ISO 200 or 400 will enhance the sensitivity of the camera while
not introducing much noise. Speeds of 800 or more will typically introduce a
degree of speckled noise into the pixels of the photograph, especially considering
that the retinal image is by nature of very low contrast.
Use the histogram feature of the digital camera to analyze your retinal images for
proper exposure level and to observe the degree of contrast.
The position of the hump in the histogram indicates the exposure level, which should
be around the middle of the range, and the width of the hump indicates the contrast
of the retinal image elements.
Using an AC adapter on the Canon camera:
To avoid having to worry about having a charged Canon camera battery, you
may wish to purchase the Canon optional item that powers the camera from
an AC adapter.
Lowering resolution on the camera:
Since the highest resolution images of the camera are finer than the optical resolution
of the instrument, you may wish to set the camera to record lower-resolution images.
This will decrease storage space and improve tethered transfer times.
Tethering software:
If you want to have live previewing and capture of photos on a computer while shooting
with the Canon camera, consider using "tethering" software.
This type of application uses a "tether" from the camera to the computer via a USB cable.
A simple version is included with the Canon camera software support disc.
DSLR Remote Pro (http://www.breezesys.com/DSLRRemotePro/)
is one popular aftermarket package sold for this application.
Tethering to a computer with a large display is the best way to instantly
review your photos for proper focus and exposure while you still have a chance to retake
a missed shot.
The small display on the camera does not adequately reveal the quality of the image focus.
Copyright 2008, 2009, 2010, 2011 Richard J Kinch
http://www.truetex.com