INSTALLING AND OPERATING THE
DIGITAL UPGRADE KIT
for the
TOPCON SL-7E and SL-7F SLIT LAMPS
Richard J Kinch
http://www.truetex.com/
Description:
The digital upgrade kit for the Topcon SL-7E and SL-7F slit lamps provides
an attachment and electronic interface for a standard digital SLR camera
in place of the original 35mm film attachment.
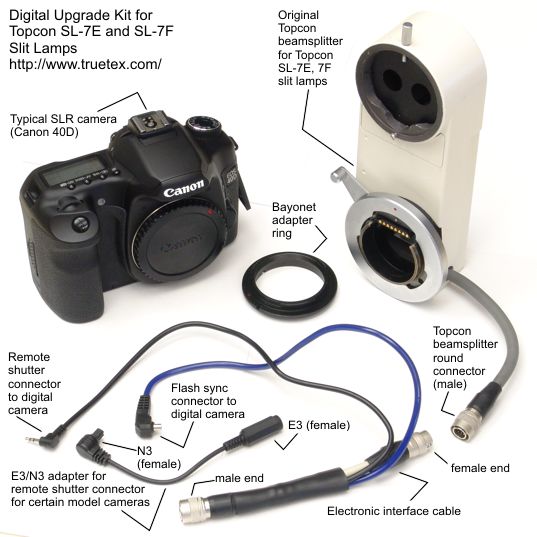
Photo 1. Digital upgrade kit for Topcon SL-7E slit lamp.
|
Upgrade Kit Contents:
- Bayonet adapter ring.
- Electronic interface cable.
- [Optional:] E3/N3 adapter cable (only for cameras requiring the N3 remote shutter connector, such as the Canon models 40D or 50D, not Canon Rebel models).
- Printed copy of these instructions.
(The current version of this kit provides an integral hot shoe connector on the flash sync cord,
which fits all Canon digital SLR models, instead of a PC sync connector shown in the photos.
Thus the separate hot-shoe-to-PC-sync adapter supplied in previous versions of the kit is no longer provided.)
Required equipment:
- Any model Canon EOS digital SLR camera.
- Topcon SL-7E or SL-7F slit lamp.
- Topcon drop-down beamsplitter for SL-7E or SL-7F slit lamps.
Any model Canon camera body is compatible with the adapter. Suggested less-expensive models are the Canon Rebel XTi, XSi, XS, or T1i.
These perform well with the adapter.
If the camera will be used for conventional photography off the instrument, consider
the mid-range Canon line, such as the Canon 50D or Canon 7D, which provide sturdier construction and a much better viewfinder.
Models such as the Canon T1i and Canon 5D Mark II will also provide high-definition video recording.
High-end models like the Canon 5D Mark II are also compatible and will provide full-frame images equal to the original
35mm film camera.
Any model camera body, including the least expensive, outperforms the theoretical resolution of the Topcon
instrument, so additional camera resolution will not improve the photographic performance.
Installing the adapter:
- Identify the kit components, Topcon equipment, and electronic connector orientation.
See Photo 1 above.
- Remove any lens from the Canon camera.
- Attach the bayonet adapter ring to the Canon camera.
See Photo 2 below.
To identify the correct side of the bayonet adapter ring which mounts on the Canon camera,
observe in Photo 2 that the Topcon side of the adapter provides a registration
slot in the bayonet ear at the 12 o'clock position.
This Topcon side with the registration slot will not fit into the Canon camera.
- Mount the Canon camera on the Topcon beamsplitter bayonet receptacle via the adapted bayonet fitting.
Rotate the Topcon receptacle arm down to lock the adapted Canon camera onto the
instrument, just like with the old film camera.
See Photo 4 and Photo 5 below for the finished installation.
A slight rotational play of the Canon digital camera on the adapter is normal.
- Detach the Topcon beamsplitter cable connection from the chassis of the Topcon instrument
by pulling the connector sleeve back.
- Connect the electronic interface cable from the adapter kit between the two connectors just
separated between the Topcon beamsplitter and the Topcon instrument.
See Photo 3 below for male versus female connector identification.
- Connect the remote shutter plug from the electronic interface cable to the digital camera body.
The 2.5mm plug on the remote shutter cable fits Canon Rebel model digital SLRs.
For other Canon models which use the Canon N3 connector,
use the E3/N3 adapter cable to connect the 2.5mm plug to your camera.
- Connect the flash sync cable to the digital camera body.
Connect the hot shoe connector on the flash sync cable to the hot shoe on the top of your digital camera.
Orient the hot shoe connector so the cable points either to the left or right of the camera body.
The connection will not be made if the cable points forward or rearward.
- Turn on the digital camera and the Topcon instrument, and verify that the digital camera shutter
operates from the Topcon joystick button, and that the Topcon flash fires from the digital
camera shutter.
- Proceed with digital photography.
Set the Topcon SL-7E flash energy to its lowest setting.
Set the digital camera initially to manual mode ("M" on the mode dial)
with 1/20 second manual exposure, ISO 100 sensitivity, and flash white balance.
Adjust the Topcon flash energy and/or digital camera sensitivity manually
to obtain correct exposures.
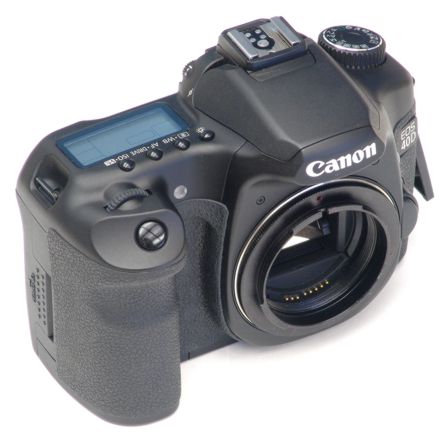
Photo 2. Canon digital SLR camera shown with bayonet adapter ring installed.
|
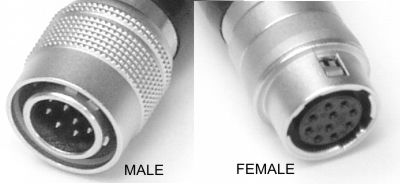
Photo 3.Male versus female connectors used on Topcon beamsplitter and the electronic inteface cable.
|
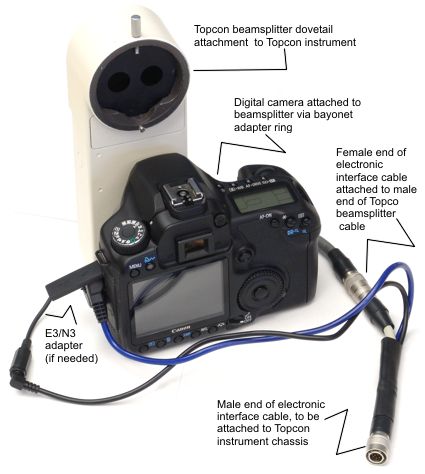
Photo 4. Installation of the digital camera and electronic interface cable on the Topcon beamsplitter.
|
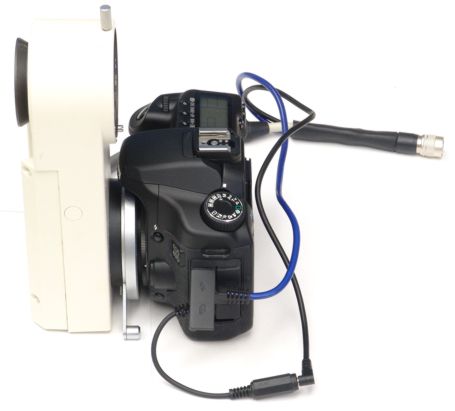
Photo 5. Side view of digital camera on Topcon beamsplitter, showing bayonet adapter ring.
|
Additional notes:
- Use the "M" (manual) mode dial setting with a short (or the shortest)
exposure time which will still capture the flash (such as 1/20 second).
- Exposure is controlled by setting the ISO speed setting of the digital camera and the Topcon flash energy.
Proper exposure is best verified by examining the photo histogram and confirming the general impression of the photo appearance.
- The adapter is designed to be parfocal with the eyepiece view.
If your photos are consistently out of focus, check the diopter calibration on the eyepieces and adjust
for the examiner's eyesight.
- Canon digital SLRs have one of two types of shutter remote connectors, known as E3 (a 2.5mm subminiature phone jack) and
N3 (a three-pin round connector). The adapter is normally supplied with an E3 plug.
Use the E3/N3 adapter for Canon camera bodies with the N3 instead of the E3 connection for remote shutter control.
Copyright 2009, 2010 Richard J Kinch.