INSTALLING AND OPERATING THE
KOWA RC-2 AND RC-3
DIGITAL CAMERA UPGRADE KIT
Richard J Kinch
http://www.truetex.com
February, 2015.
This document describes how to install and operate
the digital camera upgrade kit for the
Kowa RC-2 and RC-3 portable retinal cameras.
These two models are identical with respect to the digital camera upgrade,
so we will refer only to the RC-2 in the descriptions below.
Identify the upgrade kit contents:
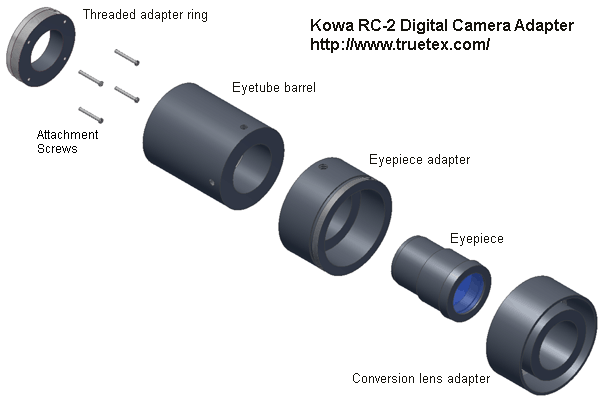
- See Figure 1 below to identify the following:
- Threaded adapter ring (aluminum with black paint) with four screws (size M2-16)
- Main adapter unit, consisting of an assembly of the following items:
- Eyetube barrel (black Delrin plastic)
- Eyepiece (black anodized aluminum with glass elements)
- Eyepiece adapter (black Delrin plastic)
- Conversion lens adapter (CLA) tube for Canon G10/G11/G12/G15/G16 (black anodized aluminum)
- Wein SafeSync hotshoe adapter (other equivalent makes than Wein may be provided)
- Flash sync extension cord
- These printed instructions

Figure 1. Kowa RC-2 digital camera adapter components (exploded diagram).
Other components you must obtain separately:
- Canon G10, G11, G12, G15, or G16 digital point-and-shoot camera. These camera models are compatible (optically, mechanically, and electronically) with the Kowa adapter.
Other camera makes or models will have incompatible optical or mechanical characteristics, or not provide a compatible
flash sync connection. Future models in the Canon "G" series may be compatible, perhaps with a different CLA tube.
- Memory card(s) for the camera.
- AC power supply for the camera (if you wish not to depend on battery power).
The adapter kit works by design with the ordinary, standard, unmodified Canon retail camera,
and with the constantly improving standard computer software supporting digital photography.
No special version or modifications of hardware or software are required.
You may process the standard RAW or JPEG images using industry standard software such as Adobe
Photoshop or Corel PhotoPaint.
Optional components you may wish to obtain separately:
- Computer and software for post-processing and viewing digital still photos.
- Computer and software for live PC preview as you photograph ("tethering").
Canon includes software for this purpose with their digital SLR cameras, or you may wish
to use a studio photography application such as DSLR Remote Pro
(http://www.breezesys.com/DSLRRemotePro/).
- An enhanced memory card providing wireless networking for instant transfer of photos
to your network storage server as you shoot.
Familiarize yourself with the digital camera and lens:
If the digital camera is new to you, study at least the following features which
will be used for retinal photography: On/off switch, mode switch "M" setting for manual operation, setting manual exposure time,
hot shoe, viewing photos on the camera, transferring photos to a computer, using live view to frame photos.
INSTALLING THE ADAPTER AND DIGITAL CAMERA
- Remove the old 35mm film camera from the Kowa instrument.
Set aside this item, as it will not be used with the digital adapter.
-
Observe the two silver rails which held the old 35mm film camera to rear of the Kowa instrument.
Observe that each of these rails is fastened to the instrument with screws.
Remove the four screws (two from each rail) which are spaced closest to the rear lens aperture of the Kowa instrument.
Leave the top and bottom screws for each rail in place.
The holes thus exposed will line up to the holes in the threaded adapter ring.
Set aside these removed screws, as they will not be used with the digital adapter.
- Use the four new screws (size M2-16) provided in the digital adapter kit
to attach the threaded adapter ring to the rear of the Kowa
instrument, using the holes where you removed the screws in the previous step.
Place the unpainted side (bare metal) side of the ring against the Kowa body.
That is, the black painted side of the ring should be exposed to the rear.
Note that an extra 1/4-inch recess in the unpainted side of the ring is designed to receive
the protrusion located at the 5 o'clock position next to the Kowa rear lens.
-
Observe that the eyetube barrel, eyepiece adapter, eyepiece, and conversion lens adapter tube should be assembled
as the main adapter unit.
Observe that one end of this unit provides an inside-threaded opening, 44mm in diameter.
Observe that the other end of the unit provides a bayonet flange for coupling to the digital camera.
-
Screw the 44mm inside-threaded end of the main adapter unit onto the threaded adapter ring until snug.
- Attach the Canon camera to the bayonet end of the assembly.
Use the red alignment dot to find the starting position to engage the bayonet locking mechanism.
Do not be concerned that the camera is not level with the Kowa instrument; this will be adjusted
in the next step.
- Loosen the nylon thumbscrew on the eyepiece adapter, rotate the camera to be level
with the Kowa instrument, and tighten the thumbscrew.
- Attach the Wein SafeSync unit to the digital camera hotshoe.
- Connect the Kowa flash sync cord to the Wein SafeSync hotshoe adapter using the sync extension cord provided.
CAUTION: DO NOT connect the Kowa flash sync directly to the camera or to a direct hotshoe adapter; connect ONLY
through the Wein SafeSync. The Kowa flash sync connection presents several hundred volts which may damage the Canon camera
hotshoe connection should the Wein SafeSync not be inserted.
-
The flash sync extension cord should easily reach the original Kowa flash sync connection.
If additional slack is needed on the Kowa flash sync cord to reach the digital camera,
disassemble the Kowa handle to
expose the wiring inside, and pull out some of the slack which should be available there.
OPERATING THE RETINAL CAMERA WITH DIGITAL UPGRADE
- Turn on the Kowa power supply and the Canon camera.
-
Set the camera to manual mode with ISO 100 speed, widest aperture (smallest f/number), and a
1/20 second exposure time.
-
Set the digital camera to manual focus, with the focus at infinity.
-
The patient pupil must be dilated for easy entry and clear views and photography.
Narrow, undilated pupils will be very difficult to examine and photograph,
due to the incident light reflecting off the edge of the pupil instead of illuminating the retina.
- Observe the instrument scene on the camera viewfinder display.
Use enough Kowa exam light intensity to yield a clear image on the digital camera display,
but not so much as to dazzle the patient.
-
Frame and focus (using the Kowa thumbwheel focus adjustment, not the digital camera focus) the subject retina using this display.
Press the camera shutter button to take a photograph.
The Kowa flash should fire in sync with the digital exposure, yielding a well-lit photograph.
-
Check the images for exposure brightness and adjust the Kowa flash energy selector and/or the
Canon camera ISO speed setting to compensate for a proper exposure.
-
Even with a widely dilated pupil,
good views without lighting flare require careful technique, due to the limitations of the hand-held
Kowa instrument design. Proper and steady alignment is critical (up/down, left/right, in/out).
Depending on the difficulty of the subject, several "takes" may be required for a clear photograph.
Fortunately, the digital camera allows for instant review and re-takes.

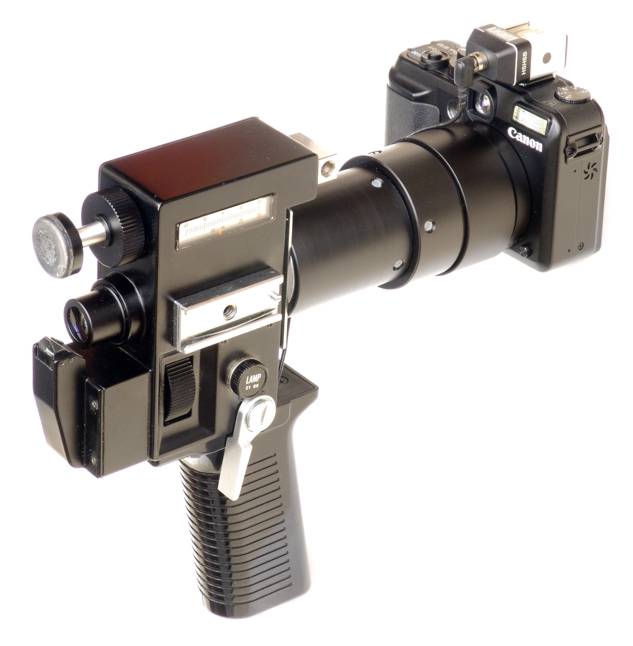
Figure 2. Kowa RC-2 retinal camera with digital adapter.
Further Notes
Analyzing exposures for optimal exposure:
Viewing the image exposure histogram in the digital camera is the only sure way to
evaluate a proper exposure.
The histogram provides a quantitative analysis of your retinal images for
proper exposure level and degree of contrast.
The goal is to have a histogram spread roughly in the middle third of the
dynamic range.
Observe the green histogram rather than the white, since for a retinal image most of the
diagnostic information is represented in the green portion of the color spectrum.
The position of the hump in the histogram indicates the exposure level, which should
be around the middle of the range, and the width of the hump indicates the contrast
Correcting exposures and improving contrast with digital post-processing:
Simple post-processing of your digital images on a computer will correct any mis-exposures and
improve correct exposures. Retinal images are by nature limited in contrast, and by digitally
stretching the contrast, the visual impression of the photographic is much improved.
Filtering enhancements such as red-free images are available via digital post-processing, even though
the original instrument may lack the physical filters.
Establish your practice routine:
After completing the above, you will have a powerful digital facility for retinal photography.
You must now handle digital data where you used to handle 35mm film slides or Polaroid prints.
It most regards the digital methods are quicker, easier, and cheaper than film, but do require
an initial investment in careful design and training. Your digital system is based on standard digital cameras, and so is
compatible with ordinary software for capturing, post-processing, and cataloging digital photographs.
Your upgraded digital retinal camera should, with occasional maintenance, provide decades of
reliable service.
Lowering resolution on the camera:
Since the highest resolution images of the camera are much finer than the optical resolution
of the Kowa instrument, you may wish to set the camera to record lower-resolution images.
This will decrease storage space and improve tethered transfer times.
These settings are found on the camera's "Quality" menu.
Tethering software:
If you want to have live previewing and capture of photos on a computer while shooting
with the Canon camera, consider using "tethering" software.
This type of application uses a "tether" from the camera to the computer via a USB cable.
A simple version is included with the Canon camera software support disc.
PS Remote (http://www.breezesys.com/PSRemote/)
is one popular aftermarket package sold for this application.
Tethering to a computer with a large display is the best way to instantly
review your photos for proper focus and exposure while you still have a chance to retake
a missed shot.
The small display on the camera does not adequately reveal the quality of the image focus.
Copyright 2009, 2010, 2012, 2015 Richard J Kinch.


