INSTALLING AND OPERATING THE
TOPCON TRC-50XF
DIGITAL CAMERA UPGRADE KIT
Richard J Kinch
http://www.truetex.com
October, 2017.
This document describes how to install and operate
the digital camera upgrade kit for the
Topcon TRC-50XF retinal camera.
Identify the upgrade kit contents:
- See Figure 1 below to identify the following:
- Bayonet adapter ring.
- Electronic interface cable.
- Viewfinder magnifier-inverter.
- These instructions.
Other components you must obtain separately:
- See Figures 3, and 4,
below to identify the following:
- Canon EOS digital SLR camera. Only full-frame Canon digital SLR camera bodies (Canon 5D Mark II or III, Canon 6D, etc.) are compatible with the Topcon adapter.
Less expensive Canon models,
including the Digital Rebel series and the 50D and 7D models, will not fit mechanically and will not have a requisite full-frame sensor.
- Memory card(s) for the camera.
- AC power supply for the camera (if you wish not to depend on battery power).
The adapter kit works by design with the ordinary, standard, unmodified Canon retail camera body,
and with the constantly improving standard computer software supporting digital photography.
No special version or modifications of hardware or software are required.
New Canon camera models in the future should also be compatible, as should
advances in Canon and third-party computer software support.
You may process the standard RAW or JPEG images using industry standard software such as Adobe
Photoshop or Corel PhotoPaint.
Optional components you may wish to obtain separately:
- Computer and software for post-processing and viewing digital still photos.
- Computer and software for live PC preview as you photograph ("tethering").
Canon includes software for this purpose with their digital SLR cameras, or you may wish
to use a studio photography application such as DSLR Remote Pro
(http://www.breezesys.com/DSLRRemotePro/).
- An enhanced memory card providing wireless networking for instant transfer of photos
to your network storage server as you shoot.
- High-definition TV for live viewfinder views, which connects via the HDMI connector on the Canon camera.
Familiarize yourself with the digital camera and lens:
If the digital SLR camera is new to you, study at least the following features which
will be used for retinal photography: On/off switch, mode switch "M" setting for manual operation, setting manual exposure time,
attaching and removing lenses, remote shutter release connector,
hot shoe, viewing photos on the camera, transferring photos to a computer, enabling and using live view mode.
INSTALLING THE ADAPTER
- Remove the old 35mm film camera or old Polaroid camera from the Topcon instrument.
These will no longer be used in the upgraded instrument.
- Observe that the Topcon side of the new bayonet adapter ring is the side with a notch through one of the bayonet ears.
The Canon side has no notch there, except there is a notch into the outer part of the ring edge.
See Figure 1 below.
- Before you attach the adapter ring to the Canon camera, verify that the Topcon side fits and locks into the
Topcon receptacle on the rear port of the Topcon instrument.
You may find that the fit of the adapter ring to the Topcon receptacle is slightly loose,
even with the Topcon receptacle lock arm all the way down.
This looseness accommodates the very close fit of the Canon camera in the following steps.
-
After this test of fit, remove the adapter from the Topcon instrument, so that the adapter is loose in your hand again.
- Attach the adapter ring to the Canon digital SLR camera body. This inserts, turns, and locks as if it were
the rear fitting of a standard Canon camera lens.
See Figure 3 below.
See also the Canon digtial SLR instruction manual, under "Attaching and Detaching a Lens".
- Attach the adapted Canon body to the rear port of the Topcon instrument, where a film camera formerly attached.
This inserts and locks into the Topcon receptacle like the original camera.
See Figure 5 and Figure 6 below.
The clearance of the new Canon camera body to the rear of the Topcon instrument covers is very close, and may require
pushing the camera forward into contact with the Topcon instrument where the "Canon" logo is printed.
This close fit of the Canon camera body to the Topcon cover is normal,
providing parfocal operation compared to the original film cameras.
If this close-fitting attachment proves difficult to the Topcon rear port (that is, you cannot get the Topcon bayonet receptacle to turn
down and lock on the adapter), then use this modified technique:
Press the Canon lens release button and
loosen the adapter slightly on the Canon body about 1/12 of a turn, so the adapter is still attached to the Canon body, but not
latched. Now attempt again to simultaneously push the adapted Canon body up against the Topcon receptacle, but with the
Canon body tipped counterclockwise 1/12 turn (that is, the grip side on the right of the Canon body will be raised up a bit).
This should allow you to insert and lock the adapter to the Topcon receptacle.
After you have locked the receptacle onto the Topcon side of the adapter, then finally turn the Canon body clockwise 1/12
turn so that the adapter locks into the Canon side with the Canon body now level instead of tipped.
These techniques should engage the adapter smoothly on both the Canon and Topcon sides of the adapter ring, with a proper mechanical
feel. Do not force the mechanism: it, or the adapter, may be damaged.
- Observe that the electronic interface cable provides three connectors: a larger round connector with 6 pins for the Topcon instrument,
a smaller round connector for three pins from the Canon remote connector,
and a square hot shoe connector.
- Insert the larger round connector of the cable into the round receptacle on the Topcon
instrument, above and to the right of the camera port.
See Figure 2 and Figure 5 below.
Orient the right-angle plug such that the two cable cords exit to the right.
- Connect the two ends of the cable cords to the digital camera: (1) hot shoe connector to the hot shoe receptacle on top of the
camera body (with the cord exiting to the left or right of the digital camera as shown in the photos),
and (2) remote shutter connector to the remote receptacle under the rubber cover on the left side of the camera body.
- Remove the small, original Canon rubber eyecup (with plastic frame) from the Canon viewfinder,
by grasping the sides and pushing up.
- Observe that the new viewfinder magnifier-inverter attachment provides an eyecup attachment fitting
similar to the original just removed.
- Attach the viewfinder magnifier-inverter to the Canon viewfinder.
See Figure 4 below.
Take care with this attachment, because the eyecup fitting is not very strong.
Accidentally bumping the magnifier-inverter can break the fitting to the camera.
The magnifier-inverter is not strictly necessary to use the digital instrument,
but without it the view will be inverted from the normal upright orientation.
This is due to the periscopic viewfinder arrangement in the original Topcon film cameras
versus the standard SLR pentaprism.
The viewfinder-magnifier also centers and enlarges the view, which would otherwise be offset
to one side and smaller than in the old film camera viewfinder.
- Look into the viewfinder via the magnifier-inverter, and adjust the Canon viewfinder diopter adjustment wheel
to bring the squares in the Canon viewfinder into focus for your eyesight.
You may also loosen the thumbscrew on the magnifier-invert to move the eyepiece in or out for additional
diopter compensation.
Practice the proper observational technique of relaxing your eyesight accommodation when adjusting this focus.
The eye relief of the eyepiece is rather far back from the eyepiece, so do not observe with your eye too close
to the eyepiece. There is enough eye relief to wear eyeglasses if needed.
Holding your eye too close will result in a vignetted view.
CONFIGURING AND OPERATING THE UPGRADED INSTRUMENT
- Configure the Topcon instrument for color photography (exciter filter dial set to "N").
- Select an initial lowest setting of 18 watt-seconds on the flash intensity dial.
- Use a fully-charged battery or external AC power supply for the Canon camera.
- Set the Canon camera as follows:
- Power switch ON
- Auto power off menu setting OFF (if using external power supply)
- Mode dial "M" (manual)
- Exposure time 1/40 SEC
- ISO speed 100
- Memory card inserted
- Tethered PC connected and running the tethering application (if so equipped).
- HDTV connected (if so equipped) with camera set to live view .
- Place your hand or other test target in front of the instrument objective and
observe it in the viewfinder. Note that the view will be dimmer than provided by the original
Topcon film cameras. This dimmer view is an unavoidable consequence of the 60:40 beamsplitter
reflex mirror and ground-glass focuser in the digital SLR camera. You must use additional viewfinding
lamp intensity to compensate. You may also find viewing a live HDTV connected to the Canon 5D Mark II is
more convenient than peering through the viewfinder eyepiece.
- Test that the camera shutter responds to the joystick button, and that the Topcon flash fires in synchronization with the
digital camera shutter, by taking pictures of a test target.
You may review the digital photos using the on-camera display, on a tethered PC, or by removing the
camera's memory card to another PC.
Adjust the proper digital exposure using the Topcon flash intensity selector, such that the digital photo
histogram is peaked around 30 to 50 percent.
-
To review photos as they are taken,
if you are using the stand-alone camera to shoot onto the camera's memory card (with no tethered PC),
use the Canon menu buttons to manually review exposures on the camera display.
You may lengthen the automatic review time with the "Review time" menu setting on the digital camera.
Zoom in when reviewing images to verify that the captured image appears sharply in focus when the video viewfinder also appeared in focus.
Note that the full resolution of the digital camera is much finer than the instrument resolution, so
the highest-resolution images will not appear in focus when zoomed in completely.
-
It is most convenient to obtain a cooperative colleague or patient for your first live retinal digital image tests.
Collimate and focus on the retina in the usual way with the viewfinder or live HD display, using the joystick button
to take exposures. Check the images for exposure brightness and adjust the Topcon flash selector to
compensate.
Analyzing exposures for optimal exposure:
Viewing the image exposure histogram in the digital camera is the only sure way to
evaluate a proper exposure.
The histogram provides a quantitative analysis of your retinal images for
proper exposure level and degree of contrast.
The goal is to have a histogram spread roughly in the middle third of the
dynamic range.
Observe the green histogram rather than the white, since for a retinal image most of the
diagnostic information is represented in the green portion of the color spectrum.
The position of the hump in the histogram indicates the exposure level, which should
be around the middle of the range, and the width of the hump indicates the contrast
Correcting exposures and improving contrast with digital post-processing:
Simple post-processing of your digital images on a computer will correct any mis-exposures and
improve correct exposures. Retinal images are by nature limited in contrast, and by digitally
stretching the contrast, the visual impression of the photographic is much improved.
Filtering enhancements such as red-free images are available via digital post-processing, even though
the original instrument may lack the physical filters.
Establish your practice routine:
After completing the above, you will have a powerful digital facility for retinal photography.
You must now handle digital data where you used to handle 35mm film slides or Polaroid prints.
It most regards the digital methods are quicker, easier, and cheaper than film, but do require
an initial investment in careful design and training. Your digital system is based on standard digital cameras, and so is
compatible with ordinary software for capturing, post-processing, and cataloging digital photographs.
Your upgraded digital retinal camera should, with occasional maintenance, provide decades of
reliable service.
Further Notes
Lowering resolution on the camera:
Since the highest resolution images of the camera are much finer than the optical resolution
of the Topcon instrument, you may wish to set the camera to record lower-resolution images.
This will decrease storage space and improve tethered transfer times.
These settings are found on the camera's "Quality" menu.
Tethering software:
If you want to have live previewing and capture of photos on a computer while shooting
with the Canon camera, consider using "tethering" software.
This type of application uses a "tether" from the camera to the computer via a USB cable.
A simple version is included with the Canon camera software support disc.
DSLR Remote Pro (http://www.breezesys.com/DSLRRemotePro/)
is one popular aftermarket package sold for this application.
Tethering to a computer with a large display is the best way to instantly
review your photos for proper focus and exposure while you still have a chance to retake
a missed shot.
The small display on the camera does not adequately reveal the quality of the image focus.
Instruments without accessory ports:
The Topcon TRC-50XF retinal camera is similar to the TRC-50X model, except that the TRC-50XF
omits the upper port for a second camera as provided on the TRC-50X.
On the TRC-50X it is preferable to install the digital camera on the
upper port and retain the original film camera (and its better viewfinder) on the rear port.
This method is not available to upgrade the TRC-50XF since it does not provide an upper port.
A similar situation applies to upgrading the previous Topcon models TRC-50VT and TRC-50V
(both upper and rear ports like the TRC-50X) versus the TRC-50F and TRC-50FT (upper port only).
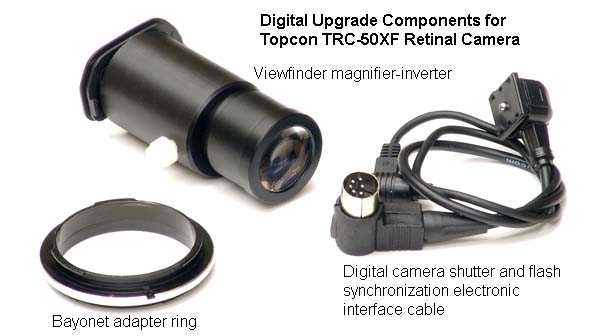
Figure 1. Digital upgrade components for the Topcon TRC-50XF retinal camera.
Components of the digital upgrade include the viewfinder magnifier-inverter for the Canon digital camera,
the bayonet adapter ring, and the electronic interface cable.
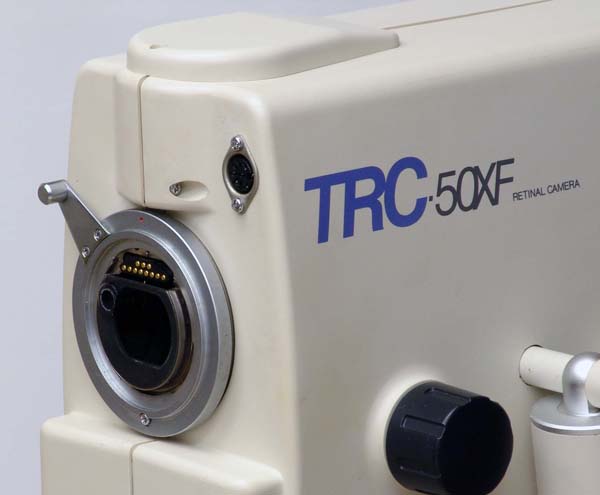
Figure 2. Rear port of the Topcon TRC-50XF retinal camera.
This is the rear port of the instrument with the film camera removed, where the digital camera will be attached.
Observe the electronic interface round receptacle above and to the right of the camera attachment.
This will receive the new electronic interface cable.
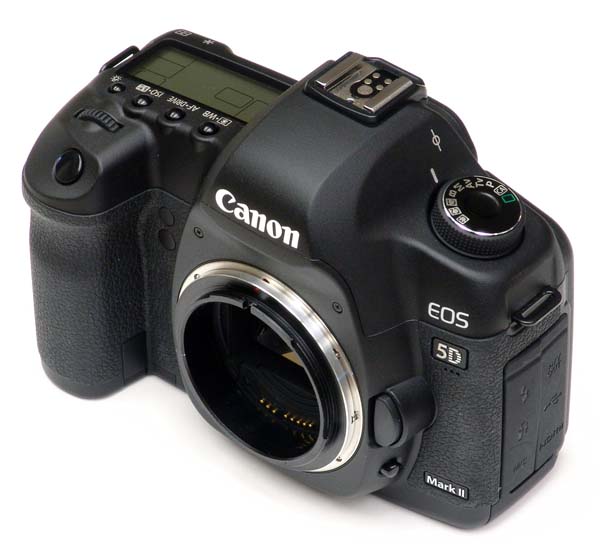
Figure 3. Canon 5D Mark II digital SLR camera body with bayonet adapter ring for the Topcon TRC-50XF attached.
The adapter ring inserts, turns, and locks, like the rear of a standard camera lens.
Observe that the Topcon side of the adapter ring has a small slot at the top.
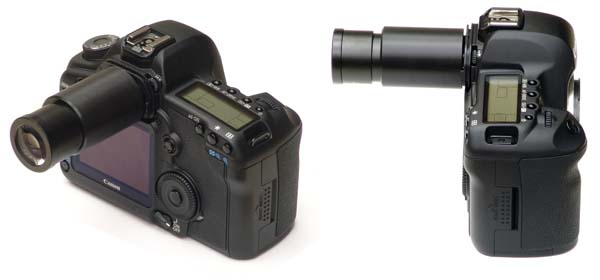
Figure 4. Canon 5D Mark II digital SLR camera body with adapter ring and viewfinder magnifier-inverter.
This shows the Canon digital camera as adapted for the Topcon TRC-50XF.
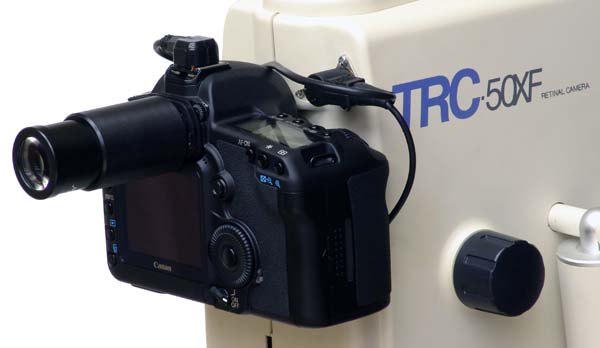
Figure 5. Canon digital camera attached to Topcon TRC-50XF.
This shows the close fit of the digital camera body to the rear of the Topcon instrument.
Electronic interface cable is connected to the Topcon connector, and wrapped around the
camera to connect to the camera's hot shoe on top and shutter remote on the left.
The cord from the hot shoe connector may exit to either the right or left of the camera.
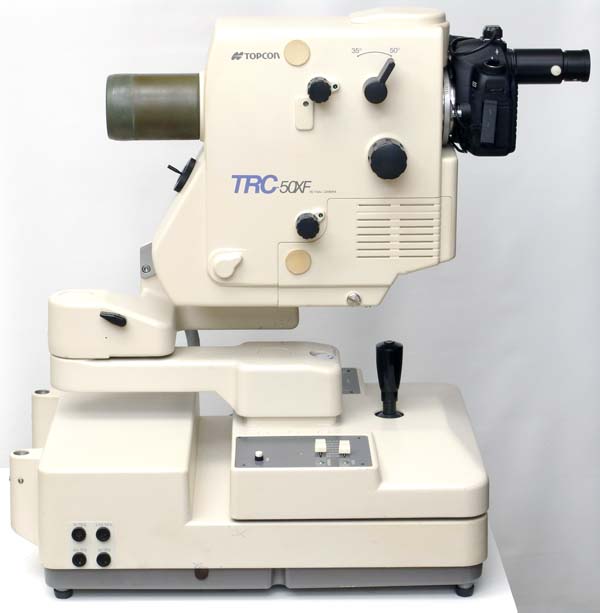
Figure 6. Overall view of the digitally upgraded Topcon TRC-50XF.
This shows the compact arrangement of the digital upgrade.
Not shown are an optional tethered PC for instant transfer and review of the digital photos, and
an optional HDTV for live viewfinder HD video and instant photo review.
Instrument headrest has been removed for this photo.
Copyright 2009, 2010, 2012, 2013, 2017 Richard J Kinch.


