Installing the C-mount Adapter for Zeiss OPMI Instruments
Richard J Kinch
http://www.truetex.com/
Updated: May, 2013
Kit contents:
- C-mount camera adapter assembly, consisting of:
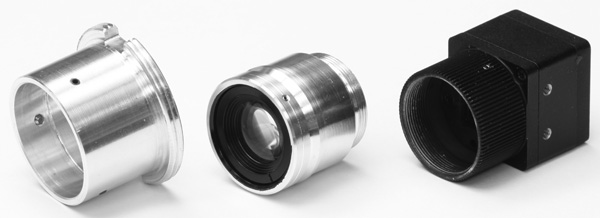
- Outer sleeve (left of photo below), which is the fitting which mates to the Zeiss OPMI accessory port
- Inner cell (center of photo below), which nests closely into the outer sleeve
- Lens body, which is screwed inside the inner cell (center of photo below)
- Small setscrews which fix the assembly of the above components together
- 1.3mm hex key for lens cell removal.
- 0.7mm hex key for focus adjustment set screws.
- Printed diagram sheet (http://www.truetex.com/zeiss_opmi_beamsplitter_c-mount.pdf).
- Printed copy of these instructions.
- Kit does not include a C-mount camera itself (typical camera shown in right of photo below).

Calibrating the adapter focus to your camera:
-
Review the diagram sheet to identify the components referred to below and how they assemble.
The shape and hole positions of the components may vary from what is shown in the photos, depending
on the type of lens body incorporated into the assembly.
-
If your C-mount camera provides a mechanism to adjust focus, you should use that feature to adjust the focus after
the adapter and camera are installed on the Zeiss instrument, and skip the
adapter's focusing procedure in the rest of this section.
If your camera does not provide a focusing mechanism, then you should calibrate the infinity focus using the adapter
features as follows.
- Remove the inner cell (containing the lens body) from the outer OPMI fitting sleeve by removing the 3 setscrews from the
Zeiss fitting, using the larger hex key.
Leave the lens body assembled inside the cell.
- Loosen the 3 tinier setscrews on the inner
cell using the smaller hex key so you can rotate the lens in the cell.
Do not remove the setscrews completely; just loosen them slightly so the lens body can turn.
- Screw the cell (with lens body inside) into the C-mount camera.
- Turn on the camera so as to have a live view.
- Rotate the lens body inside the cell to focus the camera
at infinity (such as an distant outdoor scene).
Use a probe in the dimple on the front face of the lens body, with your finger
balancing the force on the other side, to rotate the lens body in or out to find the sharpest focus.
Some lens bodies may provide a slot instead of a dimple for this adjustment; in this case, use
a small screwdriver to engage the slot and turn the lens body.
- Once you have achieved an infinity focus, tighten the tiny setscrews lightly
onto the lens body to lock the lens rotation.
Do not overtighten these setscrews; tighten just enough to hold the lens body firmly in place but
not so tight that the screw tips dig into the lens body.
However, ensure that the outside ends of these setscrews countersink below the circumference of the
cell body, so as to permit the outside of the cell body to nest smoothly into the close fit of the mating inside surface of the outer sleeve.
You must adjust all three setscrews evenly to permit them to all countersink. If one screw should
project above the circumference, you may have to release the other two slightly to permit the third
to countersink.
- Unscrew the lens cell from the C-mount camera to separate them again.
Assembling the adapter to your camera:
- Reassemble the lens cell into the Zeiss fitting, and tighten the sleeve setscrews.
- Screw the adapter into the C-mount camera.
- Loosen the setscrews on the sleeve to rotate the camera for rotational alignment.
Do not remove the setscrews completely; just loosen them slightly.
To adjust the camera to the proper rotation,
observe how the Zeiss accessory port tabs and the mating slots on the adapter
will fit together, and adjust the camera rotation so the camera (and the image) will be upright.
- If your camera provides a rotational adjustment feature, you may also use that
to adjust the camera rotation after the camera is on the Zeiss instrument.
This is more convenient, since the setscrew adjustment is not available once the
adapter is installed on the Zeiss instrument.
Installing the adapter and camera on the Zeiss instrument:
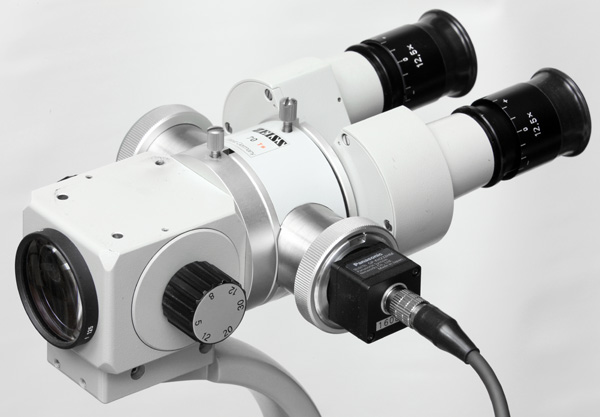
- Insert the adapter with camera into the Zeiss instrument accessory port,
fitting the tabs into the adapter receptacle slots.
- Tighten the Zeiss lockring moderately firmly onto the adapter threads.
The adapter and camera should now be rigidly attached to the Zeiss instrument.
- If the camera view is not parfocal with the eyepiece view
(that is, the camera view is not in focus when the eyepieces are in focus),
remove the adapter and repeat the infinity focus calibration above.
If the camera and eyepieces are still not parfocal, check that the diopter
settings on the binocular eyepieces are adjusted properly for the observer's
eyesight refraction.
- If the camera view is tilted with respect to the eyepiece view, repeat
the rotational adjustments by either removing the adapter to access the sleeve setscrews,
or (if provided) your camera's rotational adjustment feature.


